If you’re thinking about building an online store for your WordPress website, this guide to WooCommerce will teach you everything you need to know. There’s never been a better time to become an eCommerce entrepreneur. Buying goods and services online has become commonplace, overriding the need for in-store shopping in most cases.
WooCommerce is the eCommerce extension suite of WordPress. It is a free plugin that is scalable and relatively easy to set up.
Getting to grips with the complexities of building an online store can be challenging, particularly for first-time store builders and newcomers to the WordPress space. If you’re embarking on an eCommerce adventure and are looking for a tutorial that is easy-to-understand, to the point and free of unnecessary tech mumbo jumbo, then you’ve come to the right place.
We wrote this guide to help first-time WooCommerce users feel comfortable and excited about setting up their online store. In this guide, you’ll find everything you need to know about building an online store with WooCommerce.
You’ll learn:
- What is WooCommerce and why you should be using it above all other eCommerce platforms
- How to set up a WordPress site and install the WooCommerce plugin
- How to add products in WooCommerce, including learning about the different product types available in WooCommerce
- How to get your website ready for sales by configuring WooCommerce payment gateways
- How to set up shipping and taxes for your store
- How to beautify the front-end of your online shop using WooCommerce themes
- How to use WooCommerce extensions to amp up the volume on your store
This is a big, beefy guide so grab a tasty beverage and get comfortable. This post acts as a large reference guide so there’s no need to read it from top to bottom. We suggest bookmarking this page and using this post as a reference. You can jump ahead to the sections of the post by clicking on the links below:
Contents:
- What is WooCommerce?
- Why you should use WooCommerce to build your online store
- Is WooCommerce free?
- Getting started with WordPress
- Installing and setting up WooCommerce
- Adding products to WooCommerce
- Understanding WooCommerce product data and attributes
- Setting up payment gateways for WooCommerces
- Configuring taxes for WooCommerce
- Configuring shipping for WooCommerce
- Building the pages of your WooCommerce store
- Understanding the WooCommerce plugin settings
- Using WooCommerce themes
- Expanding your online store with WooCommerce extensions
By the time you finish reading this WordPress WooCommerce tutorial, you’ll know exactly how to set up an online store and start making sales!
What is WooCommerce?
WooCommerce is the eCommerce extension suite of WordPress. It is a free, open-source plugin that enables the functionality for selling products and services online when installed and activated onto a WordPress website.
Similarly to how a security plugin would add security features to a site, such as firewalls or limited login attempts, WooCommerce adds eCommerce functionality, including:
- Product pages
- A fully integrated cart
- User account pages
- Checkout forms
- Payment gateways
- Shipping options for physical products
- Tax calculators
- The ability to sell physical products, digital products, or both
- Coupons
- Related product and upsell
- Reporting and analytics
- And, highly extensible
With just a few clicks, you can transform a standard display or brochure site into a fully functional commerce powerhouse.
Together with WordPress, WooCommerce presents a winning combination for business owners looking to create a robust and scalable ecommerce solution for a website. WooCommerce comes with an array of extensions and add-ons and can be continually engineered to keep evolving along with a business.
Although the WooCommerce plugin is free, there are additional costs involved in setting up and running an online store.
Why should you use WooCommerce?
WooCommerce is such a popular eCommerce solution because it is free, easy to use and includes a range of powerful features.
- It is free and open-source. The software is readily available and carries no additional cost or license to download and use. Unlike Squarespace which comes with a monthly cost or Shopify that takes a portion percentage of sales, WooCommerce for WordPress is free to use with no fees whatsoever. You can make as many online stores as you like!
- It is easy to set up. As with anything in life, there is a learning curve, but once you go through the initial steps (as outlined in this guide), you’ll be able to repeat the process with ease. Once you’ve mastered the set up process, you’ll find that you can set up the WooCommerce plugin in less than an hour!
- It is easy to make a sale. One of the biggest concerns for online store users is the process of accepting payments. WooCommerce out-of-the-box offers payment integrations with PayPal, Stripe and WooCommerce Pay, and there is also the option to open up other payment gateways via add-ons.
- It is scalable. Both WooCommerce and WordPress are built to evolve. If you want to add custom functionality to your online store, WooCommerce is the most robust solution around. There are thousands of plugins and add-ons that can be used to extend the functionality of WooCommerce. You can grow your store to your heart’s content, adding unlimited products, product categories, media, and making unlimited sales.
- You will always find help and support. As WooCommerce and WordPress have such large global footprints, you have access to an international community for help and support. If ever you run into problems, you’re guaranteed to find countless professional developers that are highly skilled in the field, ready to offer WooCommerce and WordPress help.
- It integrates with your WordPress website. The WooCommerce plugin is installed directly onto your website and is run and managed without much hassle. Other eCommerce platforms run independently of a website and need to be managed as a separate entity. This can create extra work for you and lead to increased software licensing and subscription costs.
- It works with any theme. Regardless of how you decide to build your WordPress website, WooCommerce will work with any theme. Whether you’re using a simple WooCommerce theme like Storefront, a website builder such as Divi or Elementor, or are purchasing a third-party theme from ThemeForest, WooCommece will work seamlessly every time.
- It can be customized. If you want to add a very particular function to your site, WooComemrce is extremely developer-friendly. There are countless hooks that developers can tap into to create a unique form or function. Similarly, WooCommerce is easy to style using CSS so you’ll be able to design your online store look and feel with our brand identity.
WooCommerce is extremely popular, well supported, and backed by a global community of professionals. It’s an excellent solution for 99% of businesses, however, it isn’t always the best option for every brand. If you’re setting up a drop shipping model, perhaps Shopify is a better alternative. If you’re selling courses, training, webinars and memberships, a system like Kajabi may be more fitting for you.
There are a number of alternatives to WooCommerce, including:
- Shopify
- Magneto
- Prestashop
- Squarespace
Choosing the best eCommerce platform for your needs can feel like a tough decision because you don’t want to waste time. A little can go a long way to easing your anxiety. For the majority of websites, WordPress, together with WooCommerce, is a brilliant eCommerce solution that’ll have you running an online store in no time. It’s free to get started and you’re not locked into a specific host like you are when using a proprietary platform like Squarespace and other third-party solutions.
If you’re ready to begin building a WooCommerce store, there are a few things you need to get started like a domain and a web hosting package. If you already have an existing site and want to add an eCommerce extension, feel free to skip this next section.
Is WooCommerce Really Free?
Before you can play around with WooCommerce, you’ll need a WordPress website. One commonly asked question from soon-to-be WooCommerce entrepreneurs is the costs involved in running and maintaining a WooCommerce store.
While the WooCommerce plugin is free, you’ll still need to invest in some upfront costs, including a domain and web hosting package.
Domain
First, you’ll need a domain. Purchasing a domain is a standard procedure. It is typically a low-cost purchase, either paid monthly, quarterly or annually. You can purchase a domain from any domain registrar. For this, we recommend GoDaddy as they offer a wide range of domain extensions (for example .com, .co, .studio, .space, .earth).
It is good to note, the cost of a custom domain applies to all the popular ecommerce solutions. The price varies slightly from service-to-service but whether you use WooCommerce or another platform, plan on purchasing a domain name.
Web hosting
Next, you need a server. Once your domain has been purchased, it’s time to initiate a web hosting package. Web hosting costs vary depending on the hosting service provider, whether you’re opting for standard or managed hosting, and whether you’re on a shared server or something more robust.
If you’re using an entry-level standard server for your website, you may need to increase your bandwidth allocation once your online store is live as your site may require more resources. We offer lightning-fast web hosting for WordPress Divi websites via Divi Hosting. Even though our hosting is optimized for Divi and Extra themes, it’ll work perfectly for all WordPress sites.
When you are setting up your web hosting package, make sure you enable an SSL certificate. This is a crucial step in the process, especially for eCommerce sites. An SSL certificate encrypts all data through the website, adding security to prevent hackers from accessing sensitive information such as names, email addresses and passwords. This is particularly important for online stores, whose customers are trusting the store itself with their credit card details. Depending on your host, the SSL certificate may be free of charge. All of our Divi Hosting packages include a free SSL certificate.
Software and tools
Then, there are a few additional costs to keep in mind for themes, plugins and WooCommerce extensions. Themes, plugins and extensions can be free, but there are some powerful paid options that you may want to consider using.
- WooCommerce themes will assist with your site’s front-end look and feel. They can be simple such as the WooCommerce default theme, Storefront, or they can be robust and customizable like our favorite WordPress theme, Divi. If you’re using Divi, you’ll need to add a Divi and WooCommerce child theme into the mix as well. Our child themes Divi eCommerce and Divi eCommerce Pro are total winners!
- WordPress plugins will add additional functionality to the entire WordPress site. You may want to invest in a premium solution, such as a backup, security, SEO, or Divi WooCommerce plugin to add deeper complexity to your site.
- WooCommerce extensions offer complex functionality specifically for the online store processing on your site. When looking for WooCommerce addons, a few WooCommerce plugins set the main software on the site, but the real extensibility comes from WooCommerce extensions. Like plugins, extensions add robust features to the back-end of a site, but these are specifically for the eCommerce processes, not the general functioning.
We’ll discuss themes and extensions a bit further in this guide. For now, keep in mind that to develop custom functionality, there’ll be an additional cost for the software.
Maintenance
Once your WordPress and WooComerce set up is complete, and you’re making sales and smiling all the way to the bank, you need to make sure your website is running smoothly. For this, you need to invest in maintaining your site.
You could either pay your developer to keep your site secure, or you could invest in a site monitoring tool like ManageWP to look after your site. It’s important to keep site maintenance ‘costs’ in mind as, even if you’re maintaining your own site, this is a ‘cost of time’ to your company and will need to be done on a regular basis.
Production and marketing
Beyond the domain and hosting, there is also the cost of goods or service production, marketing and advertising, operations costs and more. If you are so inclined, you may want to hire a professional designer to create striking graphics or interfaces for your WordPress online store. Similarly, you may want to invest in a professional developer to create custom functionalities on your site.
Be sure to weigh up all of the options at your disposal and the respective costs. But for decent hosting and your domain name, the cost of running an ecommerce website will start around $30 per month. There are cheaper options but they will likely have slower performance, be less secure, have limited backups, and require additional purchases.
Getting started with WordPress and WooCommerce
Once you’ve purchased a domain and activated your server, you need to run a WordPress set up. Managed hosts like Divi Space come with WordPress pre-configured and active. You can skip these steps if you are using a managed WordPress host.
To set up a fresh installation of WordPress with another hosting provider, you have two options:
- Most hosts will include a one-click WordPress installation. Generally, the installer is easy to find and access, but if you get stuck, contact their support team to ask them how to set up WordPress from their server console.
- If your host doesn’t offer this, you’ll need to run a manual installation of WordPress. Here, you’ll need to place the site files onto the server and create and link a SQL database.
Change permalink settings
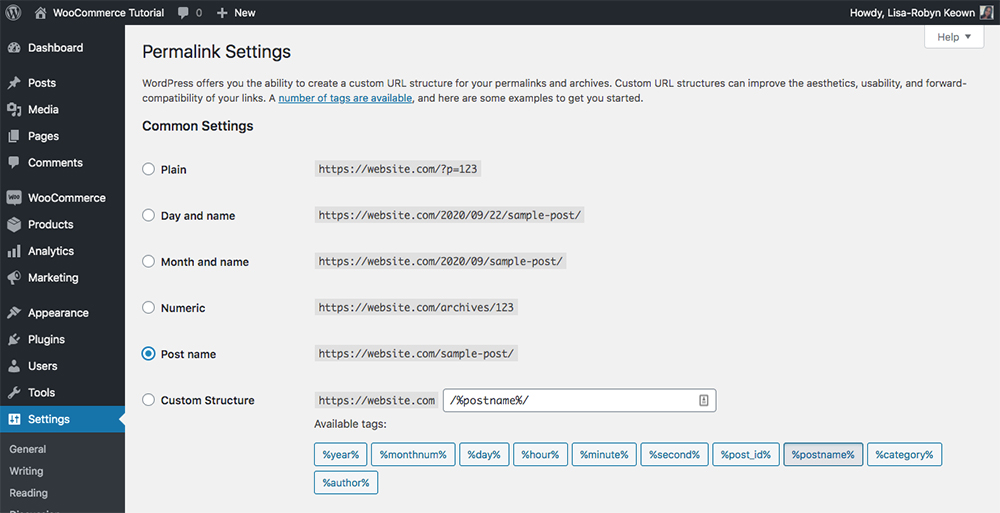
Once your WordPress install is complete, before jumping in and setting up WooCommerce, I recommend making a quick trip to the WordPress Settings arena and updating your permalinks.
Your permalink structure will dictate the format of the URLs on your site. By default, they are set to Plain. This produces URLs that are non-descript and unhelpful for site structuring and SEO. I suggest changing the permalink structure to something useful, such as the Post Name option.
To change the permalinks, navigate to Settings > Permalinks and select any of the options available (not Plain).
Change permalink structure
If you scroll down, you’ll see that there are more permalink settings available for the WooCommerce products. We’ve left this as default with the Custom Base of product.

Add custom base for products
From here, you can change other settings and variables on your site such as adding a menu or changing the site title, but we’ll jump right ahead into the WooCommerce setup.
How to install WooCommerce
Now that your WordPress website is up and running, and the SSL certificate ready to go, your dashboard should look something like this:

Example of a brand new installation of WordPress
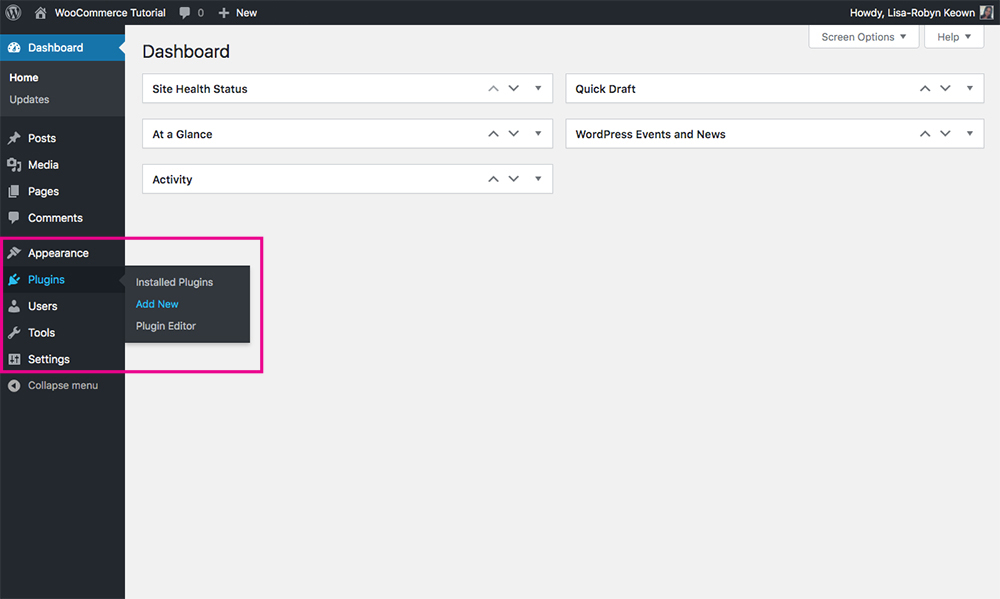
Finally, it’s time to install WooCommerce. Navigate to the Plugins menu and click Add New. If you need a detailed explanation of how to add plugins to WordPress, read this post.
Add a new plugin from the Plugins menu
Once you open the plugin console, click in the search box on the top right-hand side of the screen. Type “WooCommerce” and the plugin will display.
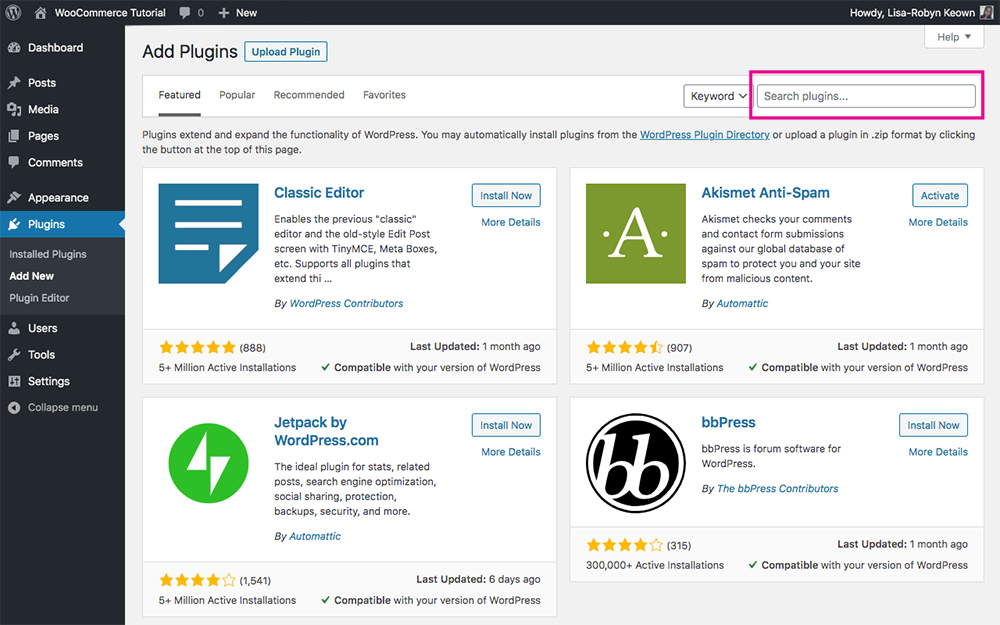
Search for the WooCommerce plugin
Click on the Install Now button. Let the installation process run.
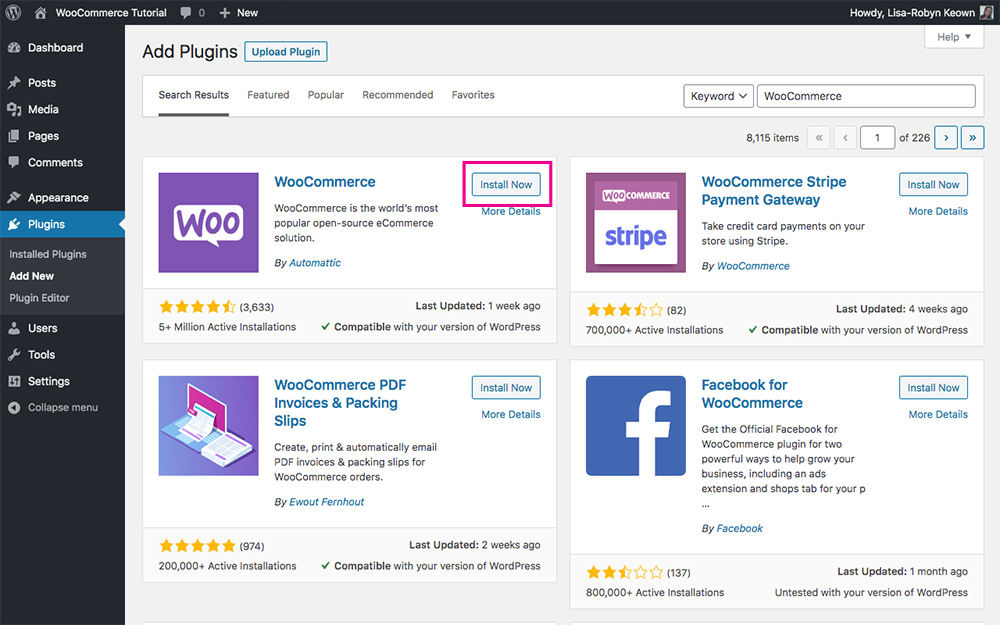
Click Install Now
After the plugin has been installed, click Activate to complete the installation.

Click Activate
Once WooCommerce is installed on your website, you’ll automatically be taken to a WooCommerce setup wizard. This easy to use wizard will show you how to set up WooCommerce in a few easy steps. You can choose to skip this step and return to it later, but for the sake of this tutorial, we’ll cover this next.
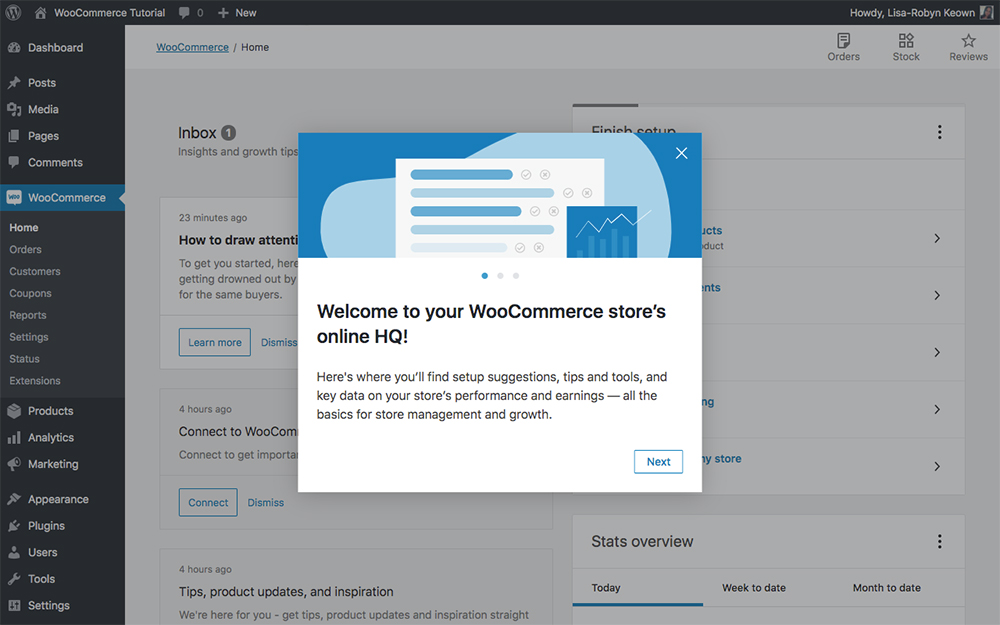
Begin the WooCommerce setup wizard
Set up WooCommerce using the setup wizard
To begin the WooCommerce wizard setup, click Yes Please.
First up is Store Details. Here you’ll enter the physical location of the store, or, select whether you’re setting it up for a client.
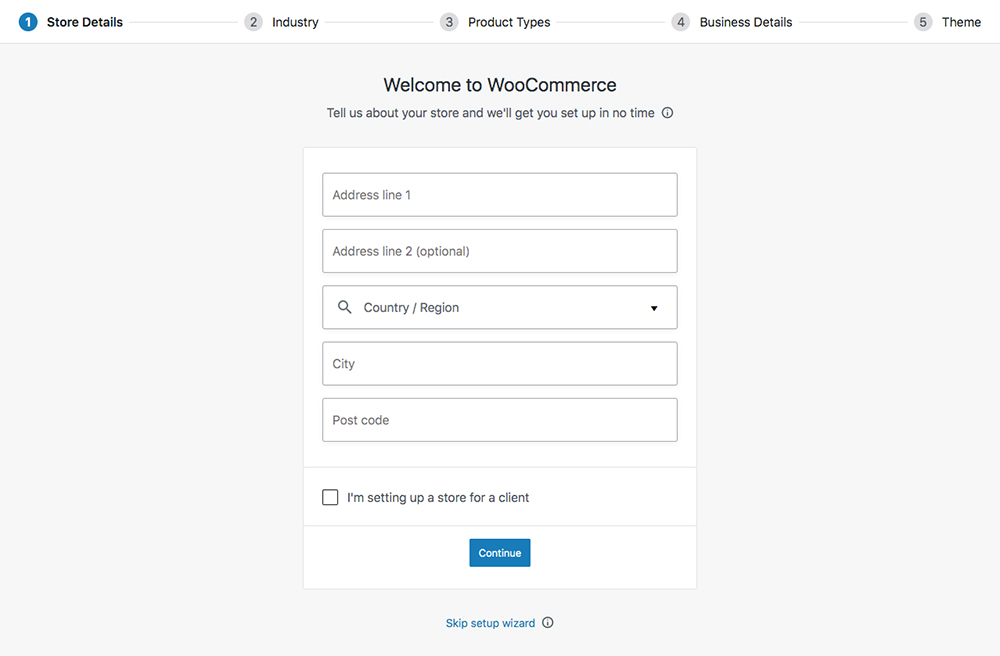
Add your business address
Next, you’ll be asked to specify which Industry your online store is operating in. Select whichever is most appropriate.
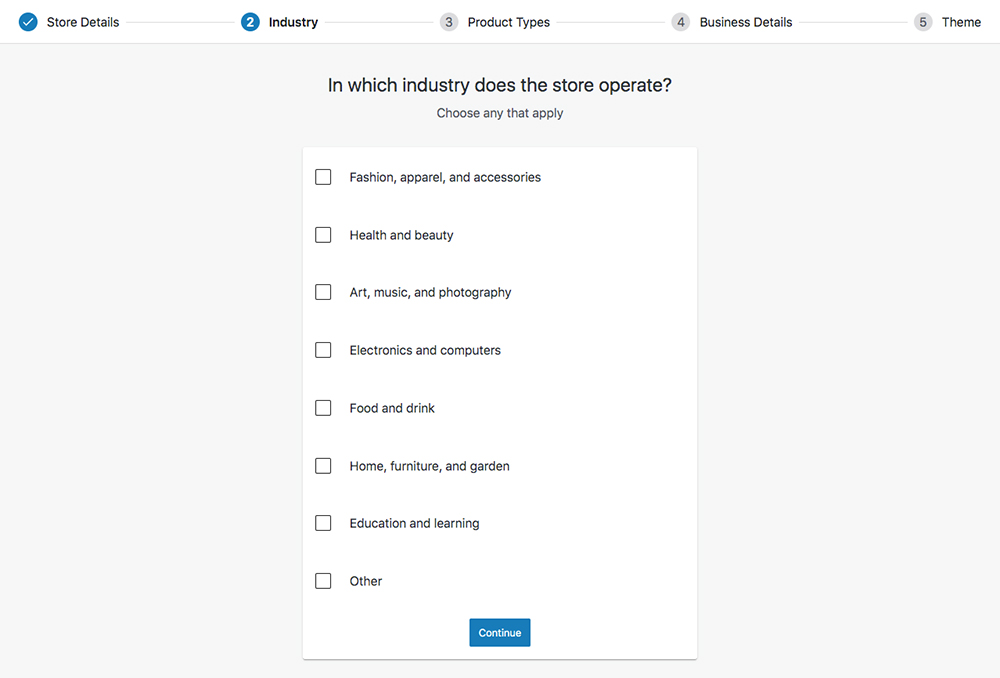
Select the industry
Then, you’ll be asked to specify the Product Types you’ll be selling. You can select between physical and/or digital products. Here you can also decide whether you want to add Subscriptions, Memberships, Bookings, Bundles or Customizable Products, for additional monthly fees. Select whichever options are applicable to your brand and click Continue.
WooCommerce product types are covered in detail a bit further in this guide.
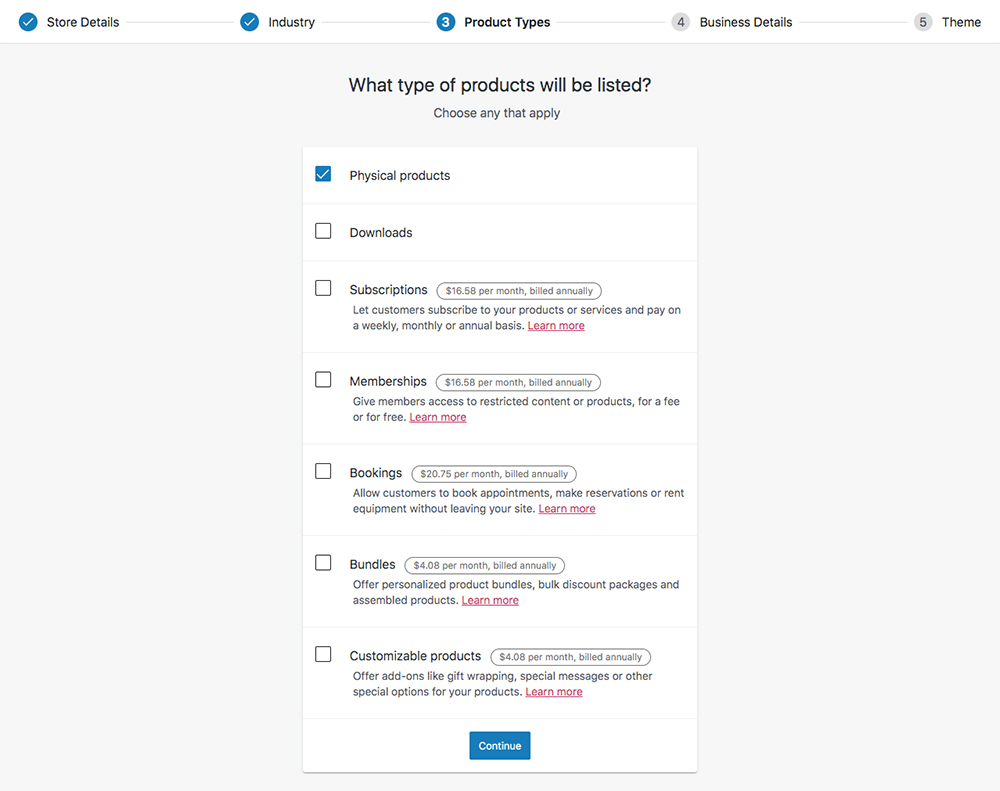
Specify which types of products you’ll sell
You’ll then be asked to specify some Business Details. You need to state roughly how many products you will be selling as well as the stage of your business.
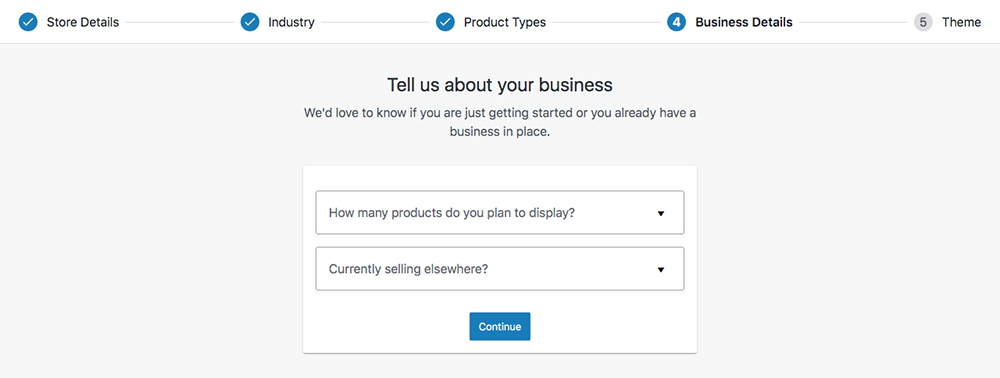
State the number of products you have in your online store
Next, you’ll be asked whether you are using an alternate eCommerce platform.
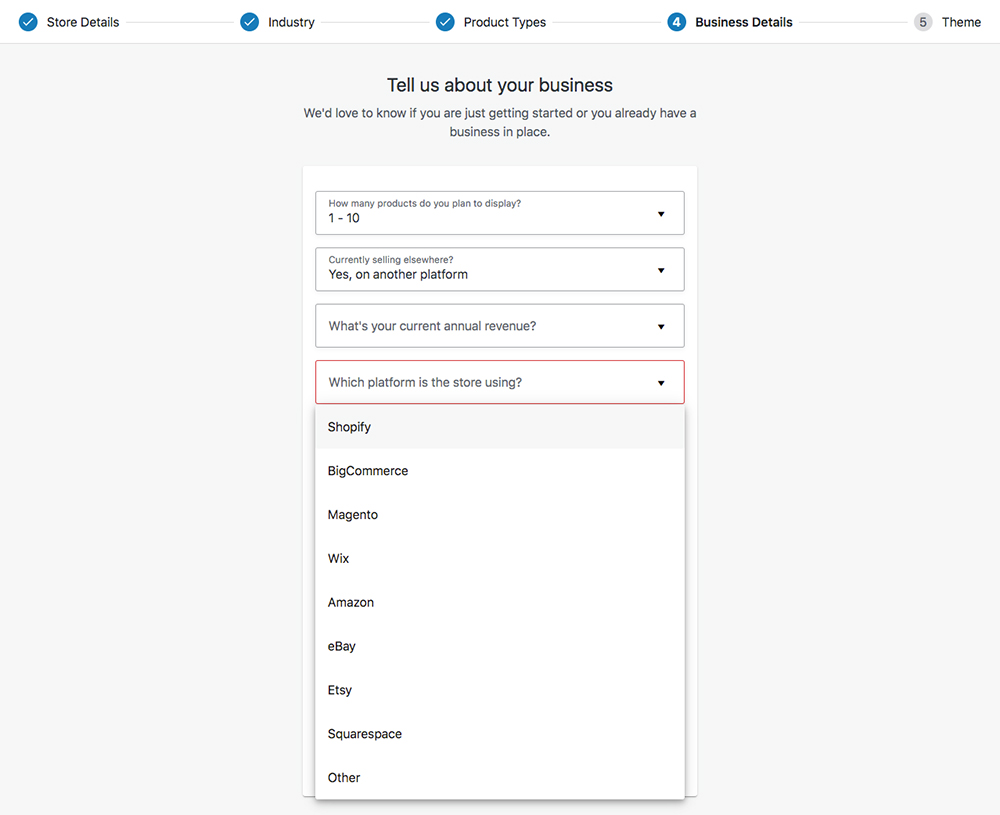
Specify whether you have used previous ecommerce platforms
Also in this step, WooCommerce will ask if you’d like to include a few extras. These are integrations with Facebook, MailChimp and Google Analytics. Choose whichever you feel works for your business. If you are unsure as to whether you’ll use these straight out of the gate, you can turn these off for now and return to them at a later stage.
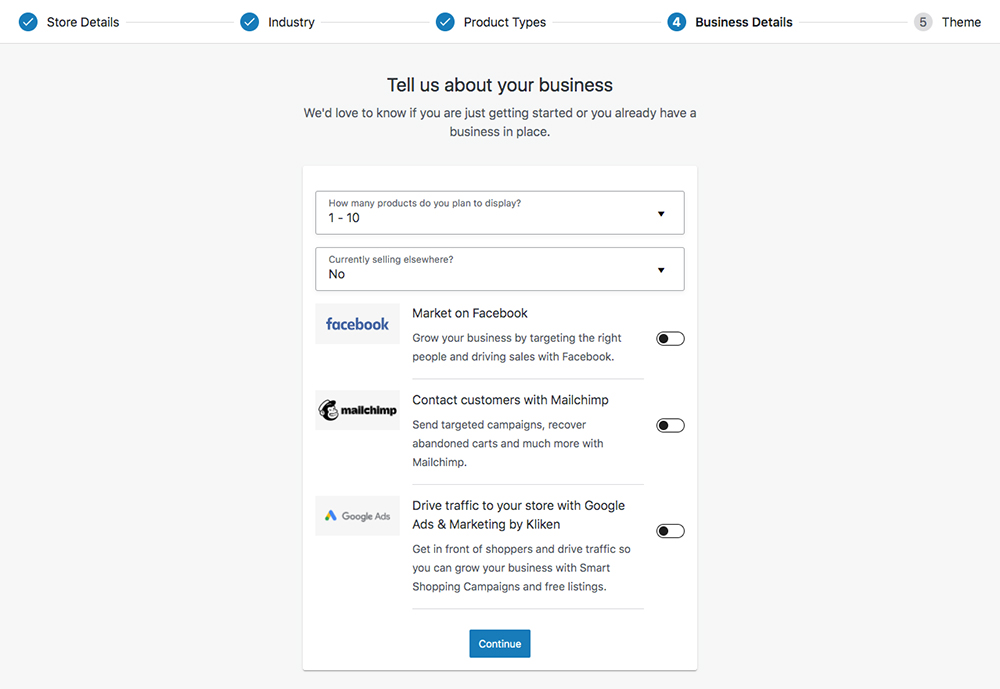
Select relevant integrations for Facebook, Mailchimp or Google Ads
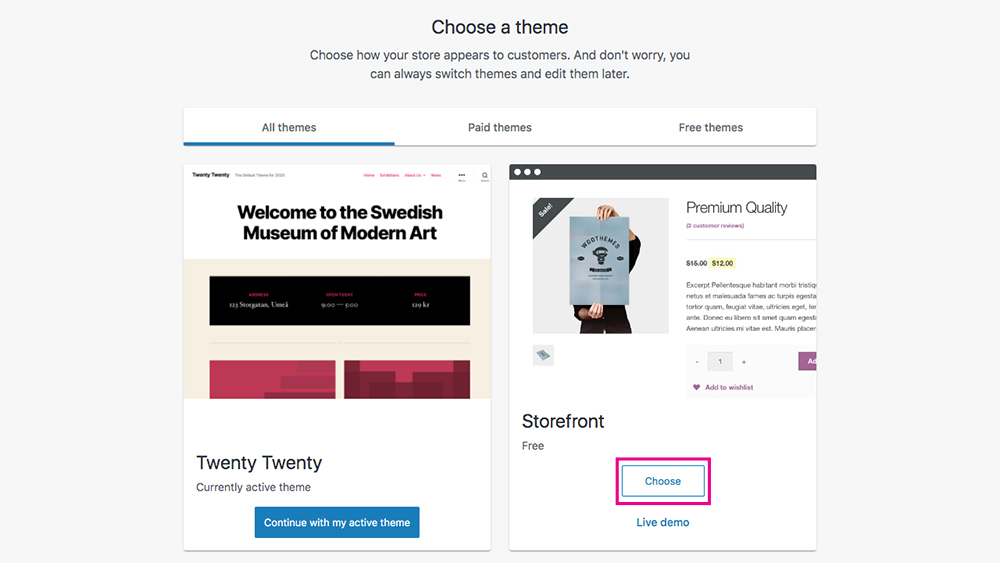
Then you’ll be asked to install a Theme.

Select a theme
There are a number of free and premium WooCommerce themes available. Everything that displays here is compatible with WooCommerce. The official WooCommerce theme, created by the team at Automattic, is Storefront.
Storefront will give you a simple, to-the-point online store display for your website. This theme has standard WooCommerce branding which can be tweaked using the WooCommerce customizer. You can view a demo of the official WordPress theme, Storefront, here.
For this tutorial, we’ll use the Storefront theme for demo purposes, but please note, you can use any theme of your choosing (our top recommended theme is Divi teamed with an e-commerce child theme such as Divi eCommerce and Divi eCommerce Pro).
To install the Storefront theme, click Choose. The theme installation will run and you’ll receive an alert notification when it’s complete.
Select a theme
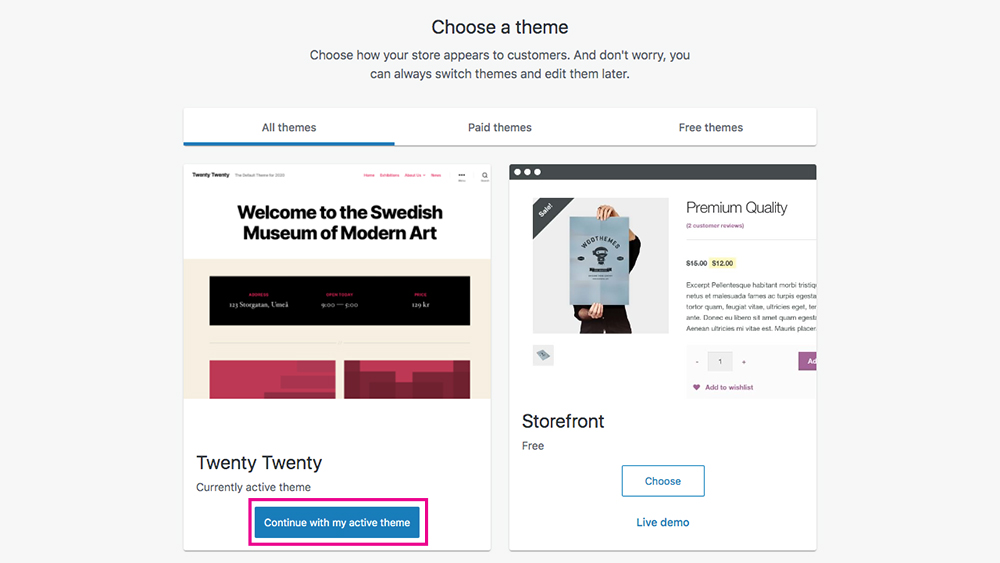
If you have already identified or are using a theme, and your chosen theme is already installed and activated, click Continue with my chosen theme.
Select a theme
Before the wizard setup is complete, you’ll be asked if you want to install the WordPress Jetpack plugin on your website.
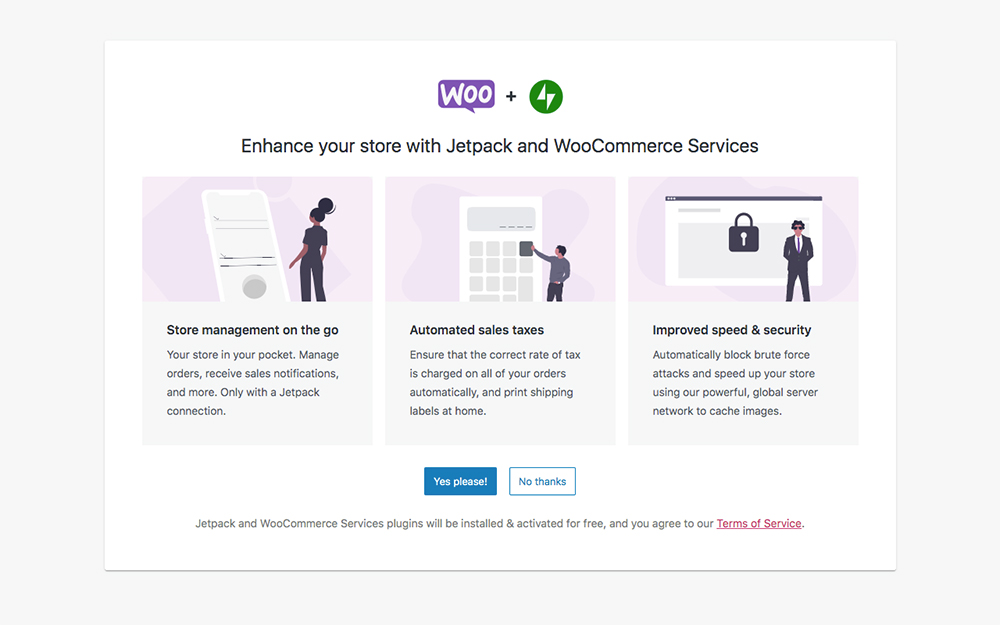
Specify whether you use the Jetpack plugin
Jetpack, also created by Automattic, is an extremely powerful mega-plugin that offers a vast selection of site customization and upgrade options.
Jetpack sometimes gets a bad rap as being too complex, and it’s often accused of producing ‘bloat’ which slows a website down. It can, however, offer some great features for WooCommerce, such as the WooCommerce mobile app setup, which allows you to manage our store via a mobile device, automating sales taxes, adding an additional layer of site security and a bump in performance.
If you’re an avid Jetpack user and are intending to install it on the site, click Yes please! to begin the Jetpack setup. It’ll run automatically and you’ll get an alert when it’s complete.
If you’re not a Jetpack user we recommend skipping this step as you’ll find alternate, better solutions elsewhere. Many first-time users ask whether they need to use Jetpack for WooCommece, and in fact, they don’t. This is just one of the many options available to WordPress users. To skip adding Jetpack, click No Thanks.
Once the setup wizard is complete, you’ll be taken to the new WooCommerce home page on the back end of your website.
Begin the WooCommerce setup wizard
Well done! You’ve officially started building a WordPress website with WooCommerce!
How to create a product for your WooCommerce store
To get started with selling online, you’ll need to add a WooCommerce product to your store. You can also sell services or downloadable assets, but the set up of these products are the same.
To begin creating a product, hover over the Products menu and click Add New.
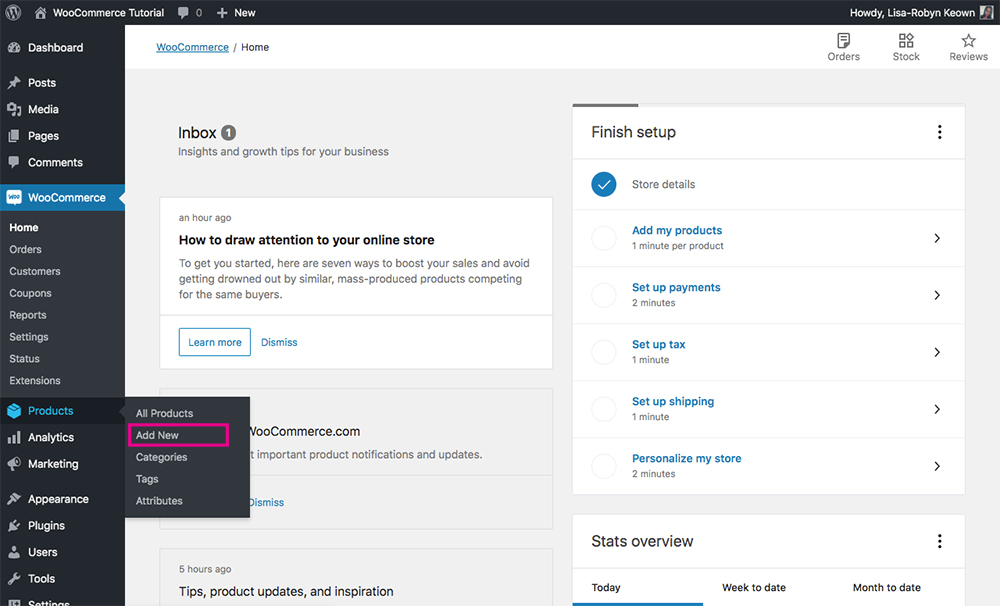
Add a product to your online store
Once you have arrived at the product page editor, add a title or name for your product. Also, enter a description of the product. This text will display as the ‘long description’ in the product listing.

Add a title and description for your product
Next, add a Category. Product categories are great as they’ll help segment and sort the products in your store to make browsing easy for your site visitor. If you have just set up your store, you can add a category from within the new product editor. Simply click Add New Category, enter the category text and save it.
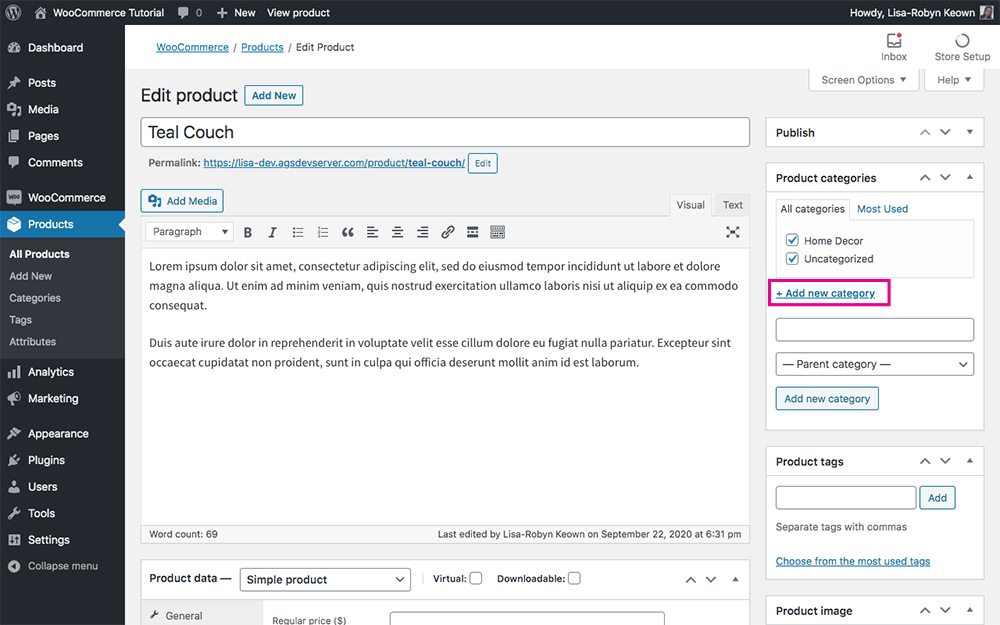
Add a new product category
If you need to add more WooCommerce product categories, navigate to the Products > Categories menu. Here you can assign a name, slug name (the text that’ll display in the URL) and description of a particular product category.
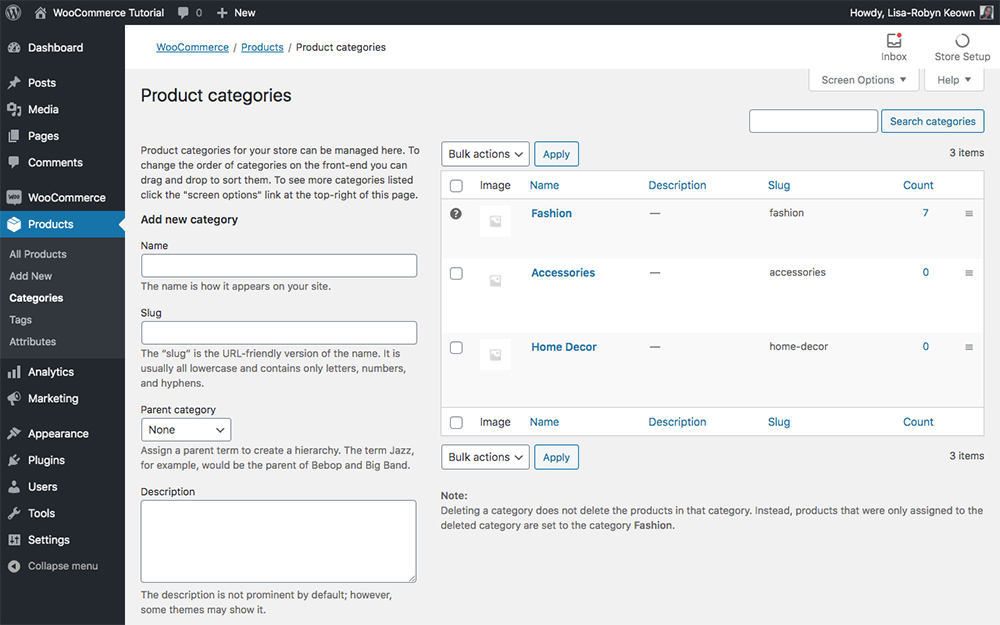
Manage your product categories
Once you have added the category via either the individual product editor or the WooCommerce category page, you can add another sort and display taxonomy called tags. These tags will be used to describe a bit of the product in more detail.
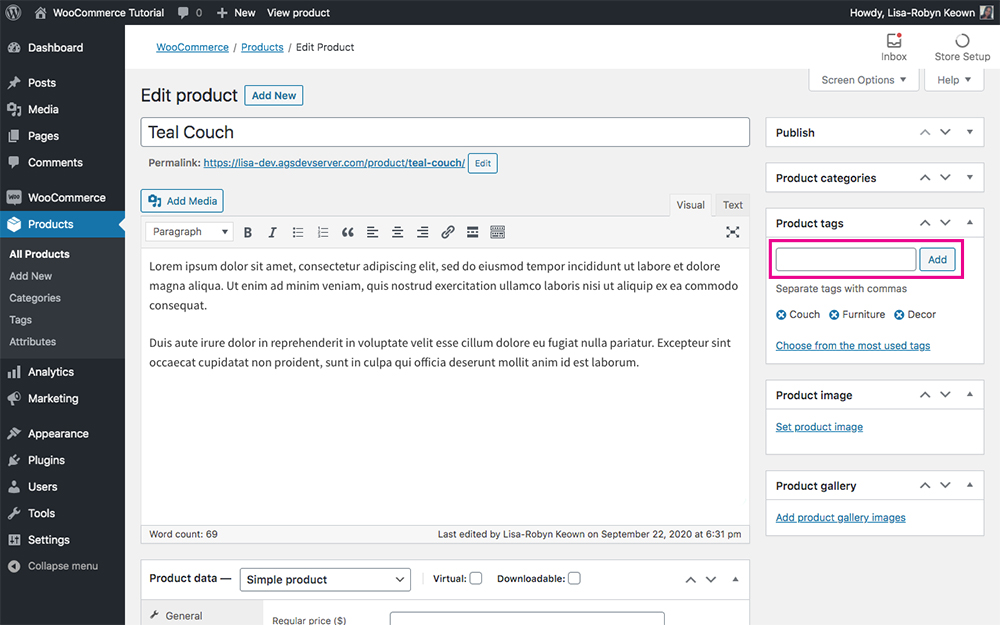
Add product tags
If you need to add more WooCommerce tags, navigate to the Products > Tags menu. Here you can assign a name, slug name (the text that’ll display in the URL) and description of a particular product tag.
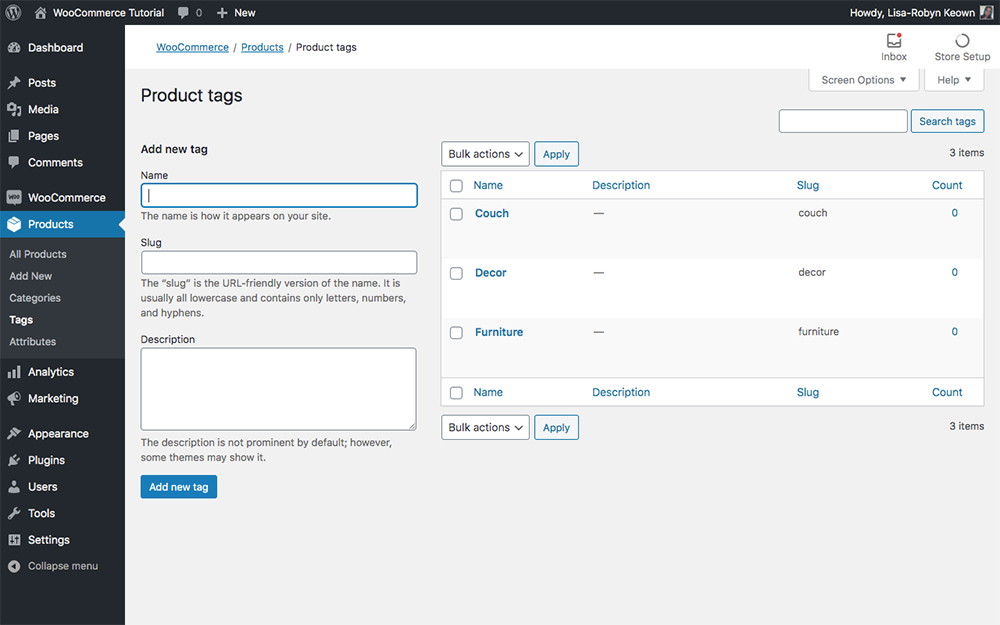
Manage your product tags
Next, you’ll need to set a product image. Click on the Set Product Image button.

Add a featured image for your product
This will open the WordPress Media Library. If you haven’t already added your product imagery to the Media Library, you can do so now by dragging and dropping your image assets into the library.
Once uploaded, select the main image for your product. The image set here will be the product’s ‘featured image’ and will display in the main Shop pages and product archive pages.
Don’t forget to add custom alt text describing the visual of the image for an extra bump in SEO.
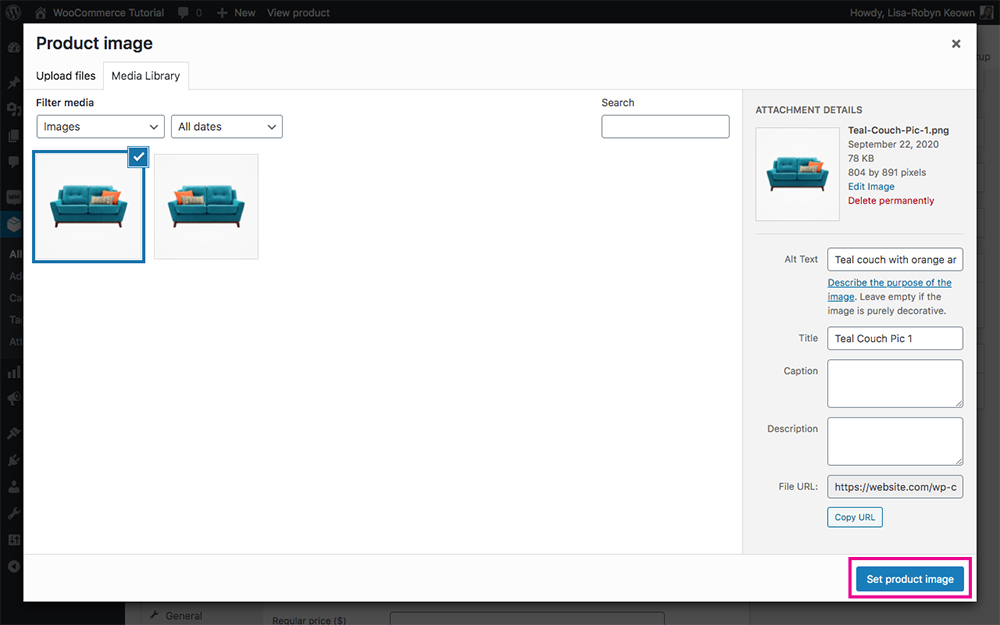
Set your product image
Once the new image is added, it’ll display as such:
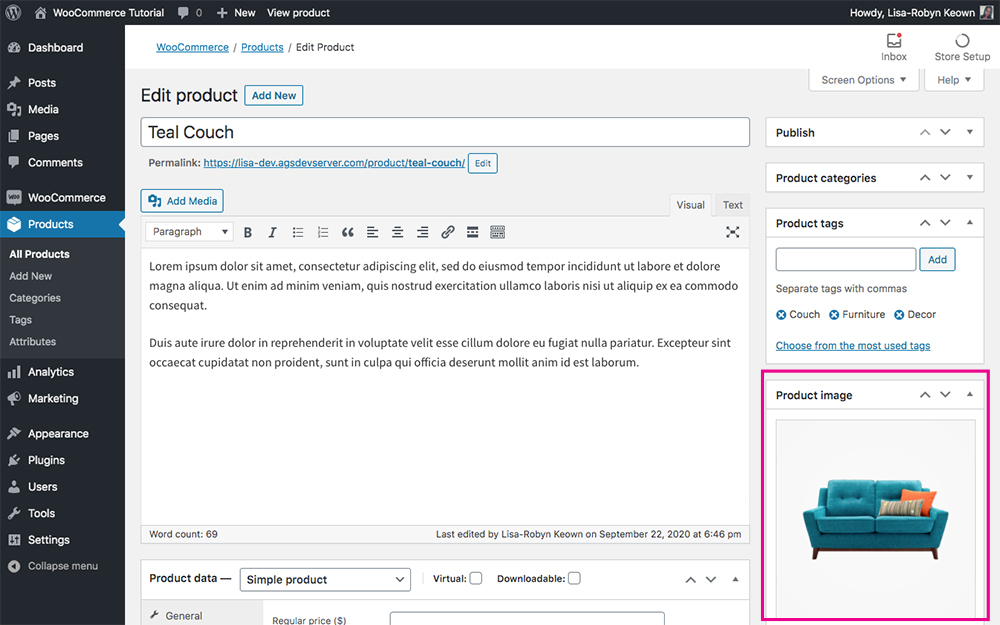
Add a featured image for your product
If you have alternate product images, you can add them to the gallery. This is great for showcasing either different angles of the product, images of models wearing or using the product, or additional product demonstration graphics.
To add the additional images, click Add product gallery images.
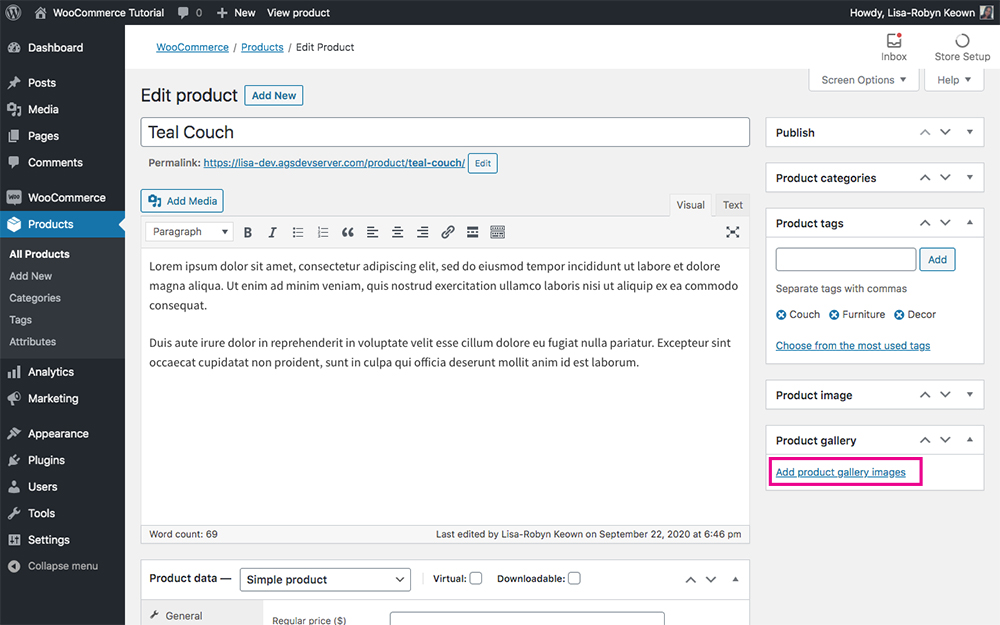
Add more images of your product
Select the respective images from the Media Library as before. Once the new gallery images have been added, they’ll display as such (please note, I’ve only added one gallery image, you can add as many as you like):
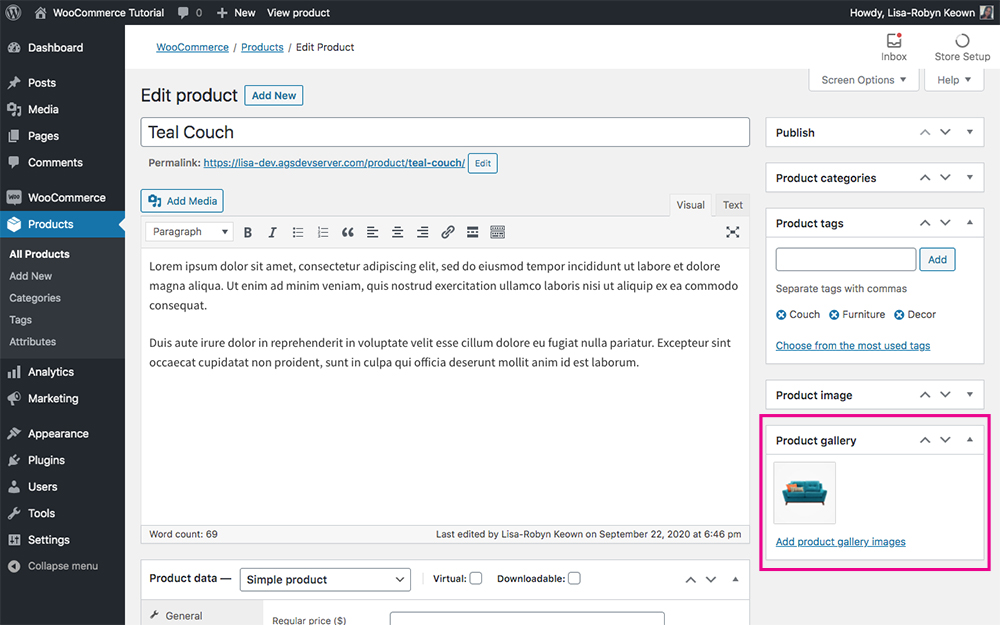
Add more images of your product
At this point, the next section is the Product Data, but for the purpose of this tutorial, skip this bit and scroll further down until you see Short Description. We’ll return to the Product Data in a bit.
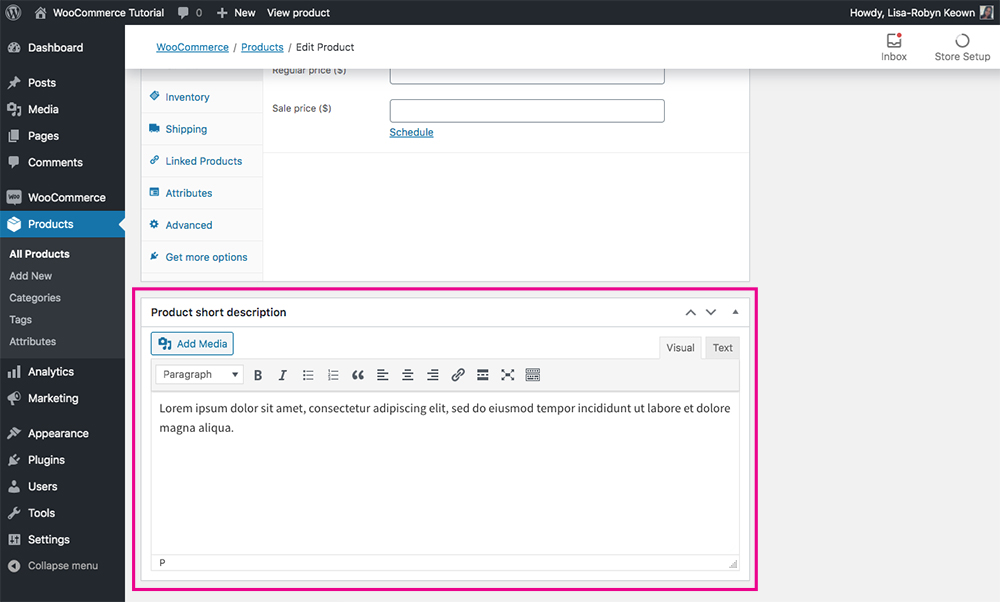
Add a short description of your product
Here, in the short description, add a small summary of the product, roughly one to two sentences. Make sure that this product copy is enticing and captures your customer’s attention, as this is the ‘showcase text’ they’ll see first.
Once you have added the short description, it’s time to review what your new product looks like on the front-end. Click Preview to see your progress.
On the front-end, your new product will look something like this:
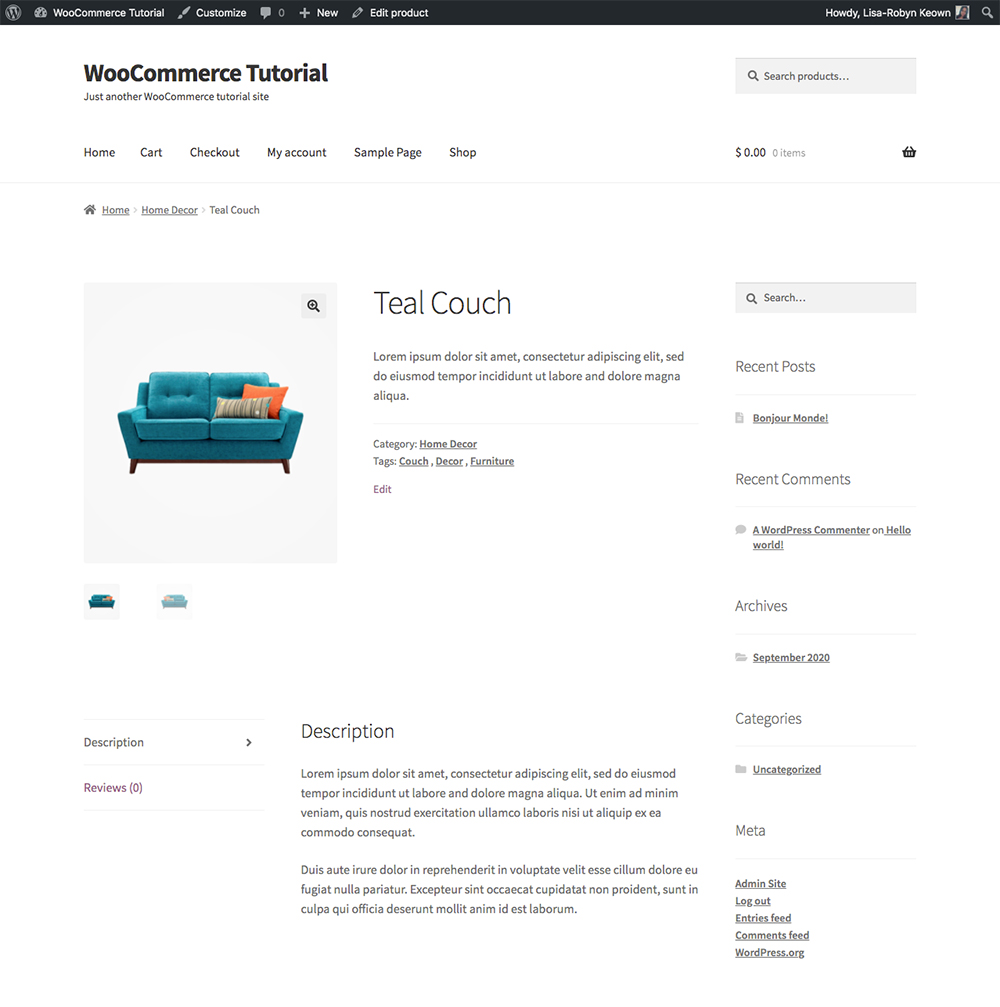
Preview of your new product
You can see that all of the information you’ve just entered – title, description, category, tags, imagery and short description – is all present. Note, we are using the Storefront theme to demo the WooCommerce process. If you are using an alternate theme, it will display in a different way as per the design of the theme itself.
WooCommerce Product Data
Return to the product listing page and head to the Product Data section. Here you’ll find product setting details related to inventory, shipping and more.
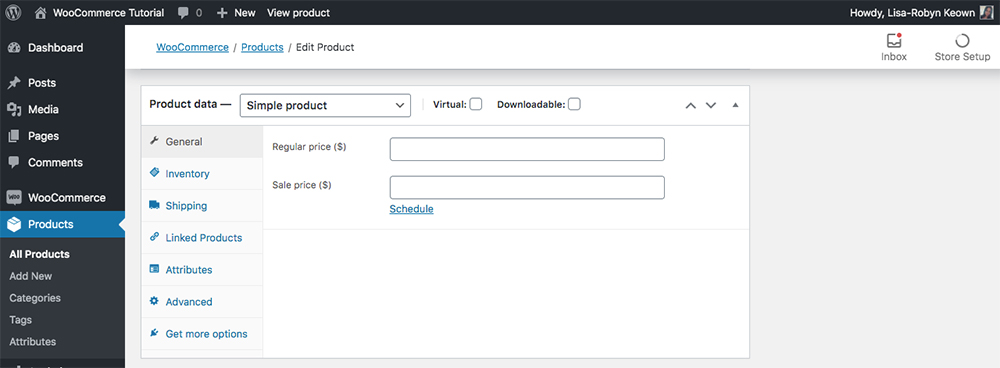
Add product data
WooCommerce Product Types
First, in the Product data drop-down menu, you can select the Product Type. There are four different product types offered by default. Classifying each of the products in your store can help with management thereof down the line.
As soon as you select a specific product type, the settings for each will change accordingly.
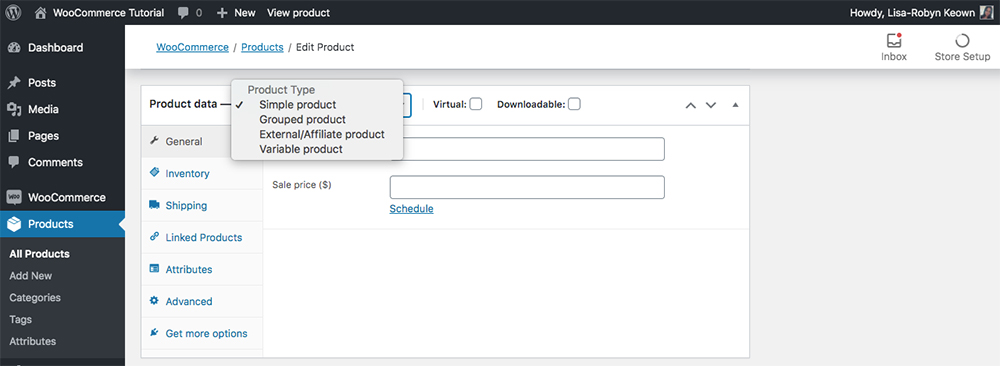
Specify a product type
There are four product types to choose from:
- Simple (which is then subdivided to virtual and/or downloadable)
- Grouped
- External or Affiliate
- Variation
As soon as you select one of the four WooCommerce product types above, the settings offered to you will change. Depending on your product type selection, you may have some or all of the following configuration options:
- General: Set the standard and sale prices of the product.
- Inventory: Add an SKU (stock keeping unit) code and manage the physical stock counts.
- Shipping: Set product weight, dimensions and select the shipping class.
- Linked products: Set related products for Grouped Products, upsells and cross-sells.
- Attributes: Add WooCommerce product attributes such as color or size for a more accurate description of the product. Also related to product variations.
- Advanced: Add purchase notes and menu orders, and enable reviews.
- Get more options: Additional WooCommerce product options such as letting customers name their own price for a product, setting minimum and maximum quantities for orders, adding product variation images, and enabling a one-page checkout.
Let’s dive a little deeper into each of the WooCommerce product types:
Simple product
This is a standard, basic product, and is the most commonly used product type in WooCommerce. A simple product is a single, stand-alone asset that has no variations and ships exactly as displayed. For example, this could be a book or a mug.
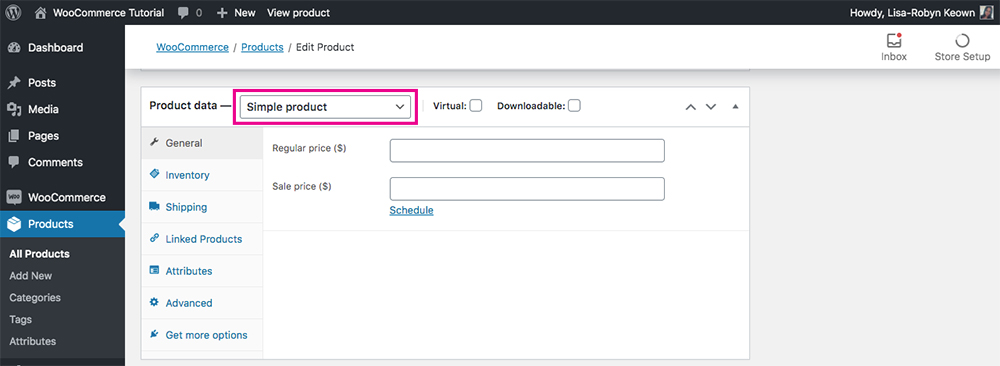
Example of a simple product
When setting up a Simple Product, you have options to specify whether it is a virtual and/or downloadable product.
A virtual product is simply one that is not a physical product. As it is intangible, there is no reason to configure shipping, and so the WooCommerce Shipping configuration menu falls away. This is quick and easy to set up as you don’t have to worry about specifying weight or dimensions. To set a virtual product, simply check the checkbox.
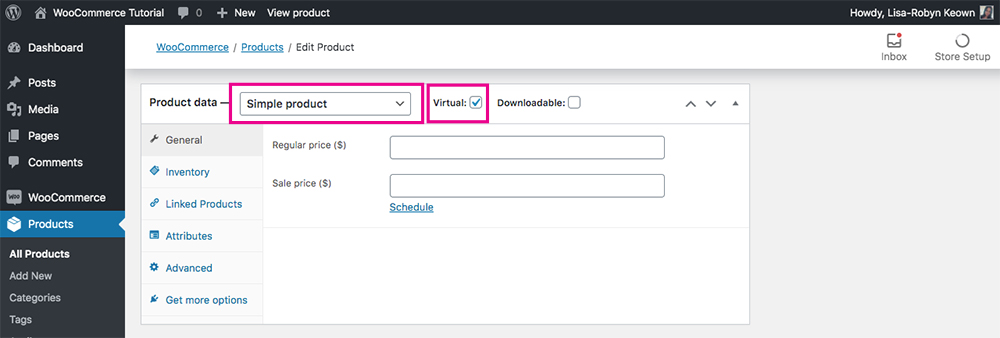
Example of a simple virtual product
Next up is a downloadable product, which, similar to virtual products, doesn’t require shipping. Downloadable products will have a specific URL path where the file itself is hosted. For example, this could be a PDF file added to the Media Library.
If you like, you can state a download limit or expiration period for the user to download the file.
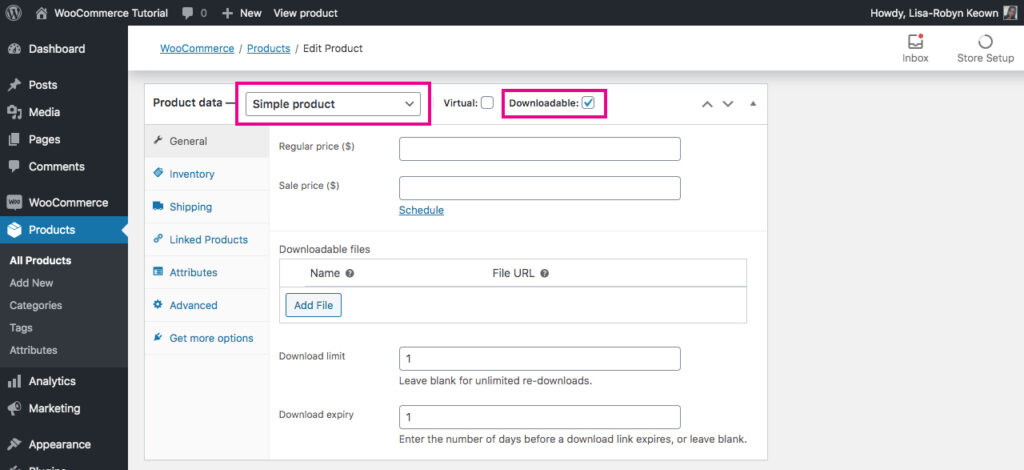
Example of a simple downloadable product
Grouped product
A grouped product is a collection of simple products all clustered together to form one new product. It’s perfect for creating bundles. The simple products may have slight variations between them, for example, a set of products within a specific collection, or they may be totally different from each other but form a bundle under the new grouped product. The grouped product won’t have a set price or individual features.
Once you select the Grouped Product option, the configuration settings change, leaving you with fewer menu items than the Simple product.
Within the collective grouped product are a collection of individual child products. As soon as you publish the Group Product listing, you’ll have the option to add new products into this suite. Once you have created a number of child products, they can be grouped together in the Linked Products tab.
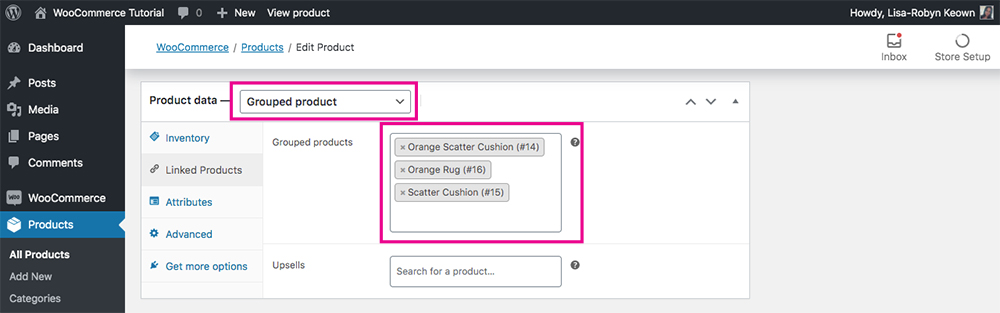
Example of a grouped product
External or affiliate product
This is a product that, although it is displayed on your site, is actually purchased by the customer via a third-party.
Sometimes, you may wish to list a product in your online store, but you’re not the actual seller. For this, customers will, when placing an order, be redirected to a particular URL to complete the order. The unique purchase URL is specified in the General settings section.
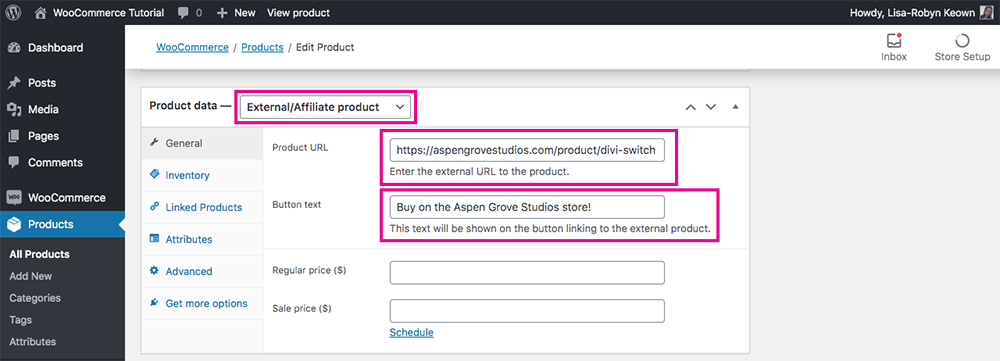
Example of an external or affiliate product
Variable product
The final product type is the WooCommerce variable product. This is for products that come in different shapes, sizes and variations, like t-shirts or shoes, available in several sizes and colors.
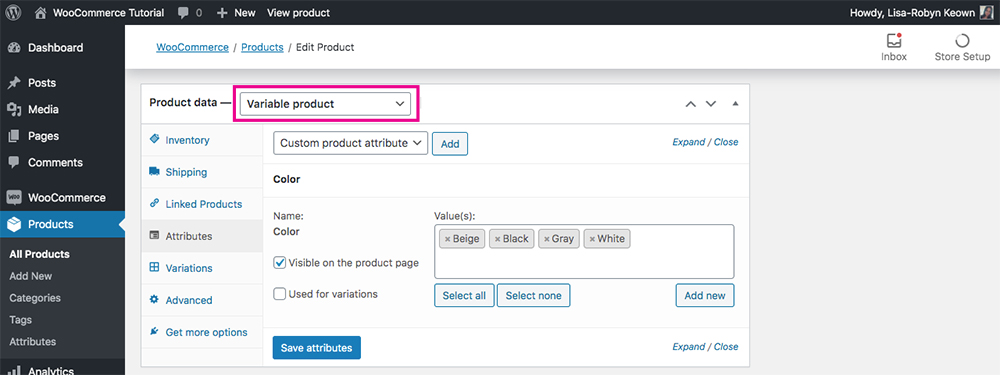
Example of a variable product
When configuring this product type, you’ll use the Variations tab. In order to add WooCommerce product variations, you’ll first have to add product attributes and define specific values for them. WooCommerce attributes are set up in the Product > Attributes menu.
What are WooCommerce attributes and how to set them up
If you sell products that include variations within the product line, you’ll need to set up attributes to showcase the options within a line. Attributes give your products a few additional layers of data, and with this, you can add degrees or values of color, size, style and so on.
A good idea for an example is a fashion company selling t-shirts. If the online store manager is adding a specific t-shirt, they could include attributes of size, color or style. The values could be
- Size: XXS, XS, S, M, L, XL, XXL
- Color: Black, White, Grey, Beige
- Style: V-neck, Round neck, Slouchy, Crop
With this extra data added to your product, you can include a sorting and filtering feature to your online store. This sort of functionality is often set up using a WooCommerce widget. If your store has products with variations, it’s recommended to include some form of filtering system to help your customer find what they’re looking for. This is good for improving your site’s user experience.
There can sometimes be a bit of confusion with attributes and variations. These two are not the same, however that are inextricably linked.
Variations are what allow a customer to select different options for a product – a t-shirt available in several colors. You’ll need to create these variations, as attributes, beforehand, in order to offer these degrees of product to a customer. However, the variations themselves, as set up in the Product type, are not for searching and filter functionality.
To begin, hover over the Products menu and click Attributes. The interface will look similar to the Category or Tag interface. Data is entered in the same way.
There are no attributes added by default. To begin, enter the name of the attribute in the Name field. If you’d like to give it a specific slug (the word that’ll appear in the URL) then enter it in the text area titled Slug. If you leave this blank, the slug will by default display as the name entered. When complete, click Add Attribute.
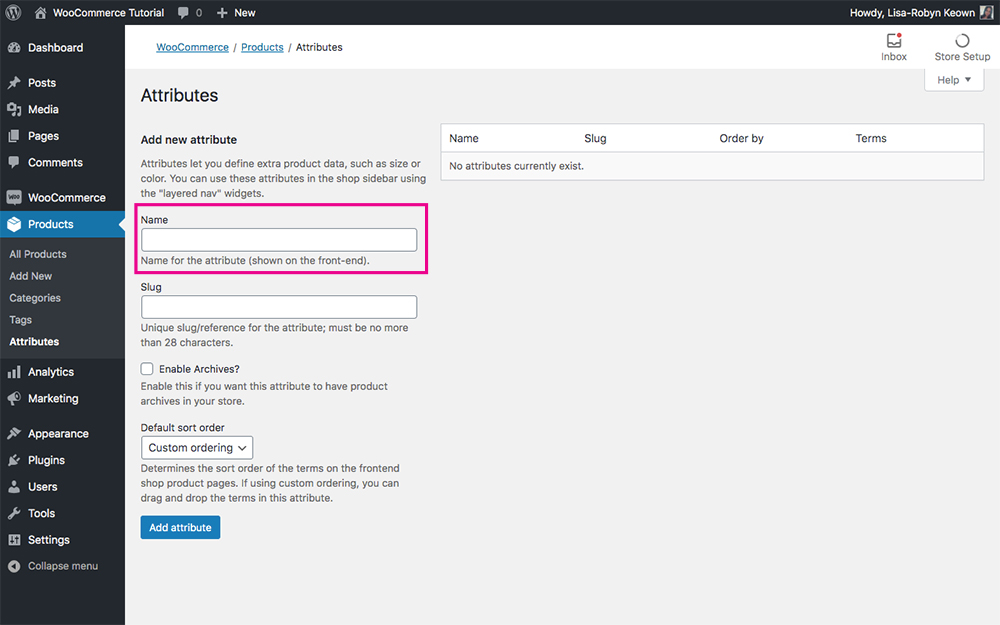
Add an attribute name
You’ll see the attribute has been added. Next, click the prompt that says Configure Terms.
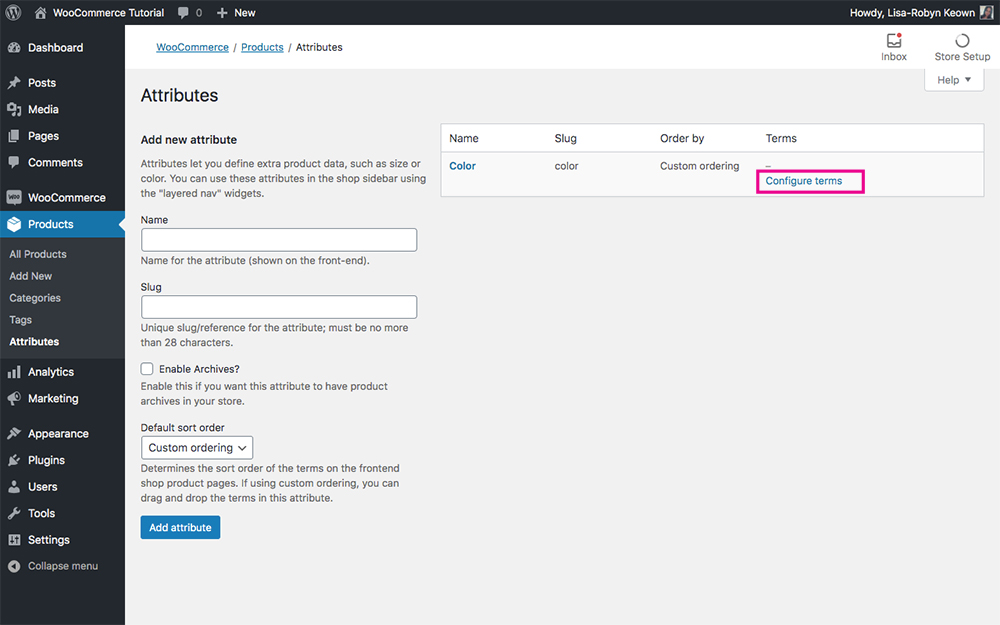
Click ‘configure terms’
You’ll be taken to a similar screen. Here, you’ll be asked to specify the variations of different degrees of the attribute.
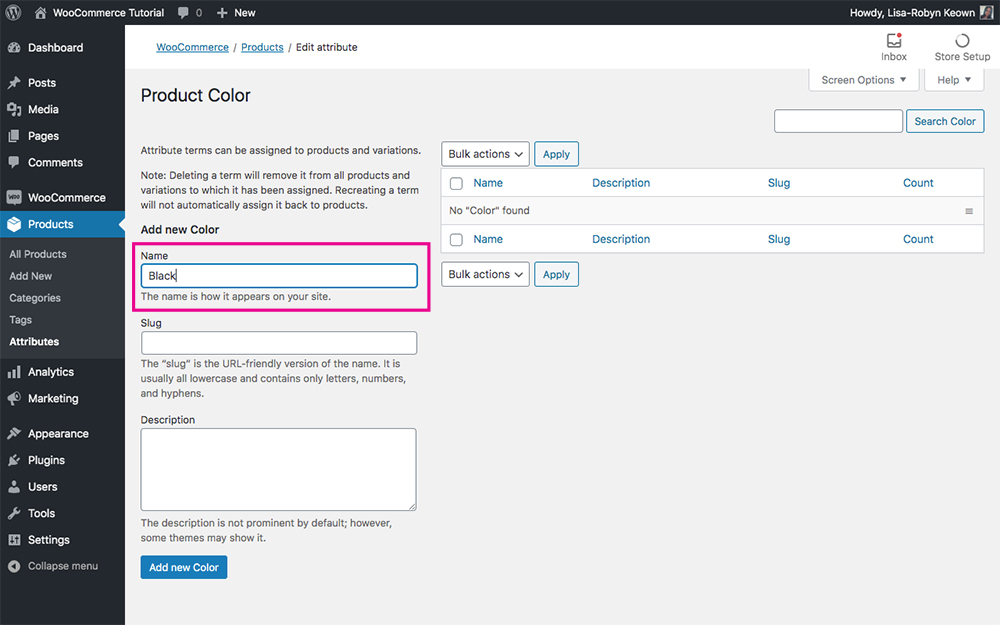
Add relevant attribute terms
Repeat this process until you’ve added each product variation in your product line.
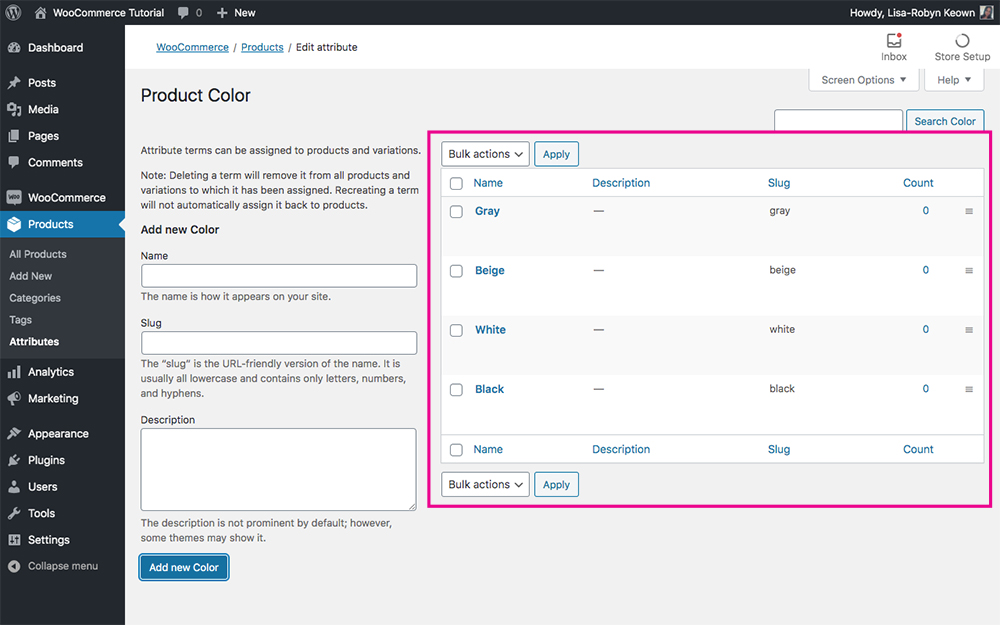
You have successfully added values
Once you’ve added all variations, return to the attributes screen. You’ll see that the attribute with its terms or values has been added. You can keep adding attributes until you’ve entered all product variations in your product line.
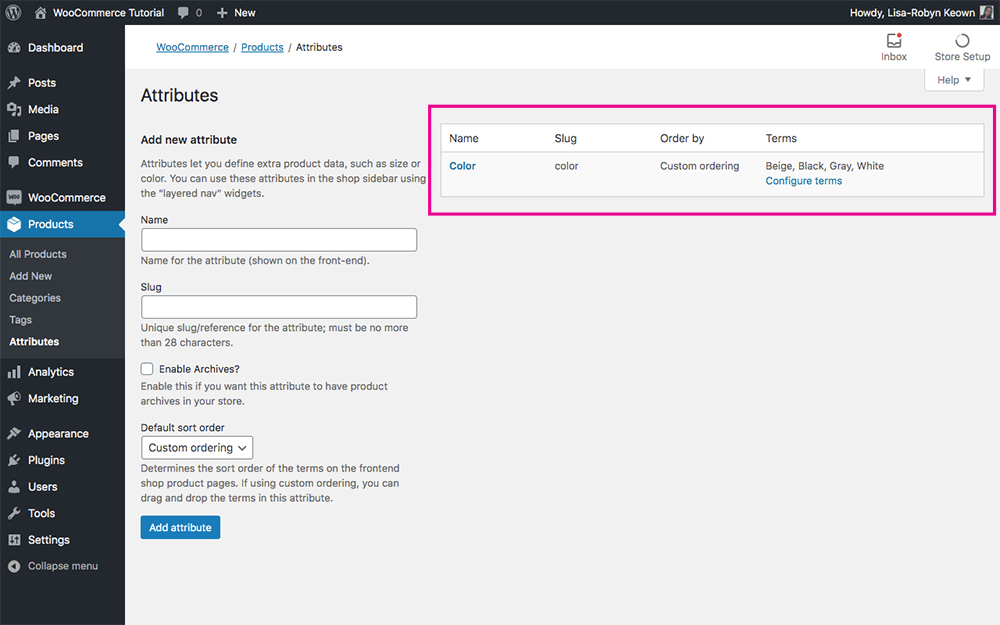
You have successfully added an attribute
When you add a product and select the product type to be a Variable Product, you can click on the Attributes menu and you’ll see the terms or values you’ve specified.

A variable product
Once you have figured out how to add products to WooCommerce, you can repeat this process as many times as you like until you’ve created listings for each of your saleable items.
How to accept payments online with WooCommerce
Now that your products are all set up, you’ll need to make sure you can make a sale, get paid and grow your profits. The next step is to set up the payment gateways for your WooCommerce site.
Navigate to the WooCommerce > Home menu and click on Set up payments.
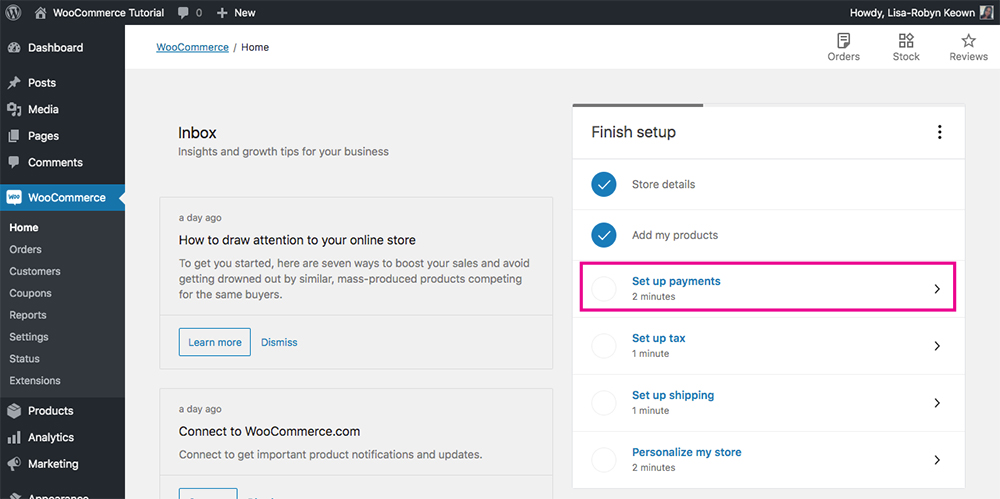
Use the WooCommerce set up wizard to set up payments
You’ll be asked to select the best WooCommerce payment gateway for your business. This demo shop is set to be based in the United States, so the following payment gateway options are available (note, these may be different depending on your location):
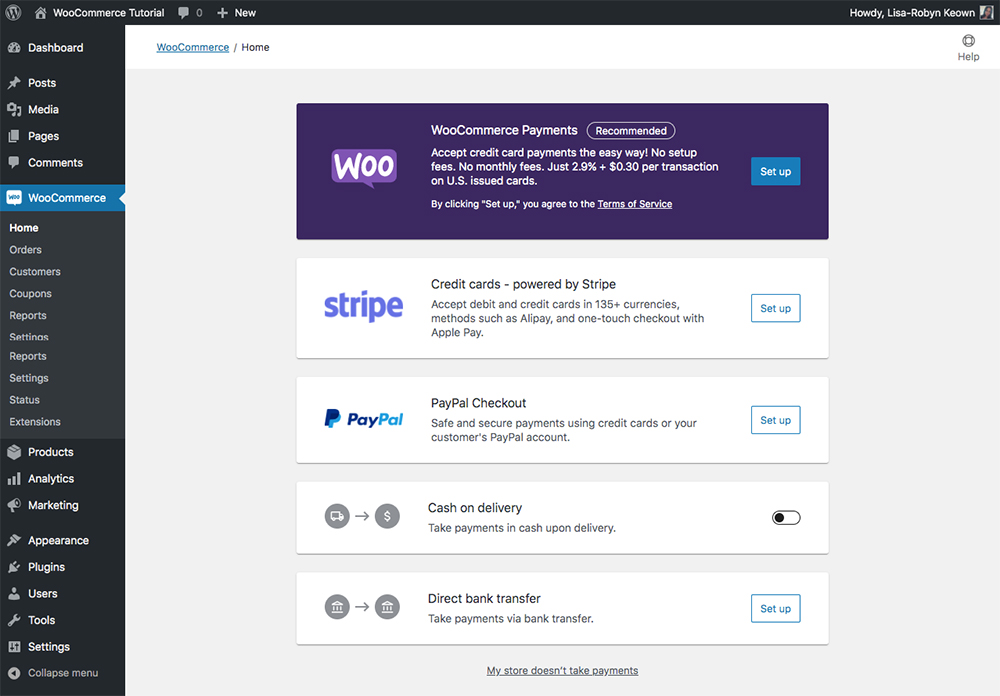
Select the most fitting payment gateway for your online store
Selecting WooCommerce payment gateways
WooCommerce payments
Powered by Stripe, WooCommerce Payments is a simpler and more effective payment solution for WooCommerce stores.
Select WooCommerce Payments as your payment gateway
Developed by the team at WooCommerce, WooCommerce Payments helps both merchants and customers by providing a streamlined shopping experience for both users: merchants can enjoy the ease of having all payment processing details in one central place, and customers can complete their purchases directly on-site.
Along with accepting credit and debit card payments, and processing refunds, WooCommerce Payments integrates with WooCommerce Subscriptions to manage recurring and subscription-style payments, giving merchants a robust payment solution no matter their type of store they have.
Once installed on your site, you’ll find an easy-to-use dashboard that tracks all of your payments and transactions. The WooCommerce Payment extension is free to install and there are no monthly fees, however, transactions carry a fee of 2.9% + $0.30. At present, WooCommerce Payments is only available to merchants in the United States who are selling products in US dollar currency.
Stripe
Stripe is a popular option for businesses looking to accept credit card payments online. Stripe processes payments via all major credit and debit cards, it also offers customers the option of paying via Apple Pay, Google Pay, and Alipay.
Select Stripe as your payment gateway
Available in over 40 countries and supporting payments in over 135 countries, Stripe lets merchants process payments, recurring payments and refunds with ease. While there are no monthly fees for holding a Stripe account, there are transaction fees of 2.9% and 30 cents.
With functionality already built into WooCommerce, Stripe payments are easily enabled via a free plugin. One of the best things about using Stripe is that payments are made on your site, rather than being directed to an external site. This seriously improves the user experience of the site.
PayPal
One of the most well known, oldest and trusted payment processors is PayPal. One Of The pioneers in the ecommerce payment space, PayPal offers payment solutions for business and personal financial services. Since PayPal has been around for so long and has become one of the go-to payment processors for the web, it’s almost guaranteed that your customers will have a PayPal account.

Select PayPal or PayPal Pro as your payment gateway
Offering PayPal as a payment option is great as users can decide to pay via credit card or their PayPal account. This, teamed with the fact that PayPal is widely available and processed in multiple currencies, makes it an effective and easy payment option for both merchants and consumers.
WooCommerce includes built-in integrations with PayPal, enabled via a free extension. If you’re selecting PayPal as your payment gateway, know that there are two options available to you: PayPal and PayPal Pro.
- PayPal: The standard PayPal experience, this requires a PayPal business account. Charges are calculated based on the account type, transaction and number of sales. The payment process is a bit discordant as users can’t pay on-site and are directed to the PayPal website to complete their purchase.
- PayPal Pro: This is a more expensive solution than standard PayPal. For a monthly cost, PayPal Pro brings a more streamlined purchase experience to customers, offering them on-site payments via PayPal’s processor, PayPal Pro is only available in select countries.
Other Payment Gateways
WooCommrece is fully integrated with an array of alternate payment gateway. If the options mentioned above don’t fit your requirements, research some of the popular alternatives including Authorize.Net, Square, Skrill, 2Checkout and many more.
Alternate Payment Methods
Within the WooCommerce setup, you can select from two alternate payment methods that do not require the setup and integration of a payment processor. They are:
- Cash on delivery: Allow your customers to pay cash in hand upon receipt of their purchased product.
- Direct bank transfer: Allow your customer to pay via wire or bank transfer directly into your business bank account.
Integrating Payment Gateways
If you decide to set up WooCommerce Payments, PayPal or Stripe, you’ll be taken to a new page to configure your account. WooCommerce will automatically begin installing the respective plugins and ask you to connect your account.
Here’s an example of the WooCommerce Stripe gateway set up. Using Stripe for WooCommerce is a great option as it allows you to take credit card payments with ease.
If you decide to add Stripe as one of your online payment methods, click Set up. Next, you will see an alert notification showing that the WooCommerce Stripe plugin has already been installed (this happens automatically). You’ll also see the prompts to connect a Stripe account.
If you decide to add a PayPal gateway as one of the WooCommerce payment options, you’ll have a similar procedure to follow for setting up PayPal for WooCommerce.
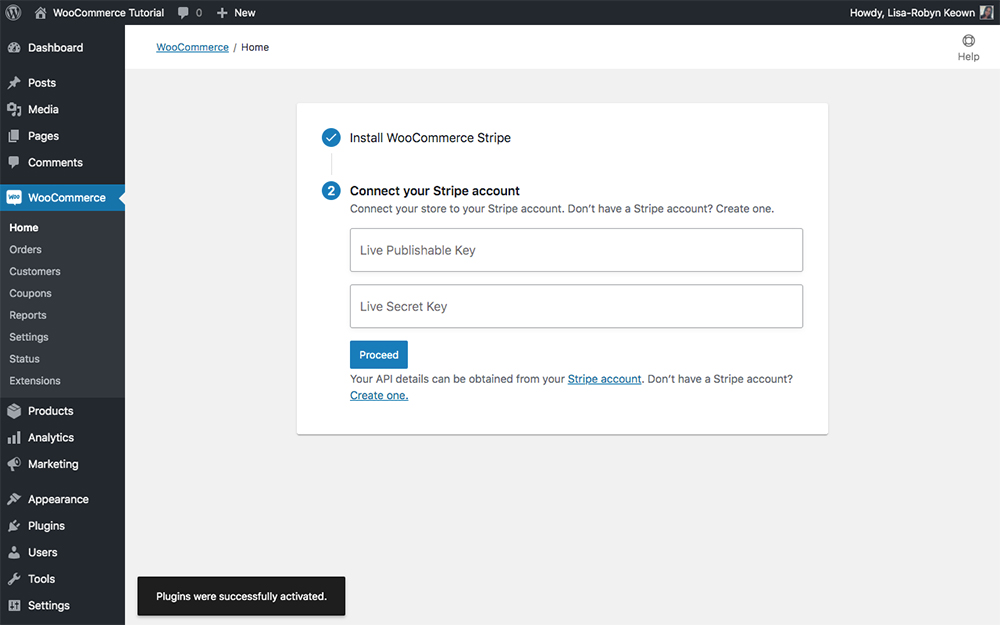
Connect your Stripe account to begin accepting payments
Deciding on the best payment gateway for WooCommerce is a process. You need to make sure that you offer enough options to your customers, and that these payment options fall in line with their buying behavior. You will certainly need to include a WordPress credit card processing option for your site (WooCommerce Stripe is a great option if available in your region). If your customers would prefer a cash on delivery option, make sure to offer this too.
Once you have configured your WooCommerce payment methods, you’re almost ready to start selling your products.
Configuring WooCommerce sales tax
By this point, you’re probably itching to start selling but there are still a few important steps to go. The next one is setting up WooCommerce sales tax.
This is probably the most intricate step in the entire online store set up process, but it’s really important to get set up right, and thankfully, WooCommerce makes this configuration relatively easy.
If you are a Jetpack user, the plugin will help you set up WooCommerce automated taxes. If you are not a Jetpack user, you’ll need to set up taxes manually.
We dive deeper into the process of setting up WooCommerce sales tax in this post. Here, we’ll take you through each of the tax options so that you understand each and every setting. You’ll also learn how to add a new tax rate and how these can vary based on your online store’s specifications.
Please note, we are not accountants or tax practitioners, we are merely offering this advice in our tutorial to guide you along with best practices. The information we here is meant to be used as a guideline and is not in any way legally accurate or binding.
It’s important to work with an accountant when selling and shipping goods. You’ll need to calculate the accurate tax and VAT amounts for your products, and pay extra special attention here if you are shipping internationally. If you are selling between country to country, it is your responsibility as the merchant to pay the correct taxes on both goods and the shipping thereof.
Please consult your accounts and legal team when configuring sales tax for your online store. If you are unsure about the tax implications of your online store, please seek out professional help from either a tax practitioner or tax lawyer.
Once you have successfully set up taxes for your online store, you can move onto the next important step: configuring shipping.
Set up shipping for WooCommerce
Now that your taxes are all set up, the next task is to configure your online store’s shipping settings. If you’re selling physical products, you need to ensure that your store is geared to sell and deliver your inventory.
Customers want to receive their purchases in good condition, and they don’t want to wait too long for them. As the owner of an online store, it’s your responsibility to provide a hassle-free shipping process.
For an in-depth guide on setting up WooCommerce shipping zones, methods and classes, read our tutorial.
Set up the homepage of your WooCommerce store
Now that all of the hardcore configuration settings are out of the way, you can move onto setting up the front-end of your store. Return to the WooCommerce > Home page and click Personalize my store.
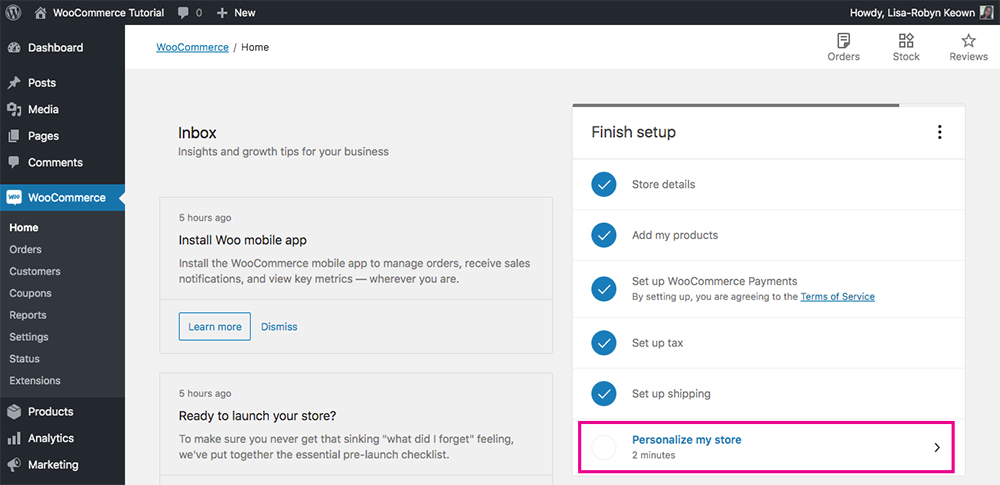
Use the WooCommerce wizard to personalize your store
You’ll be directed to a screen that’ll first ask you to customize your homepage.
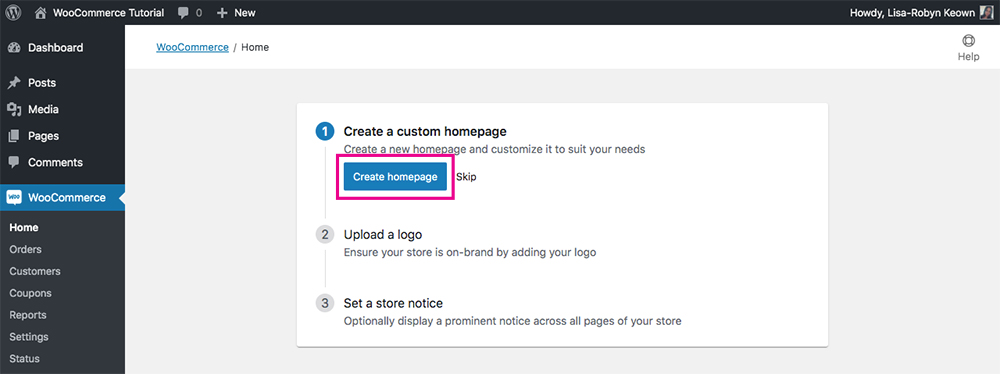
Create a homepage for your online store
Once you click Create homepage, WooCommerce will automatically generate a home page for your site. When complete, click Customize.
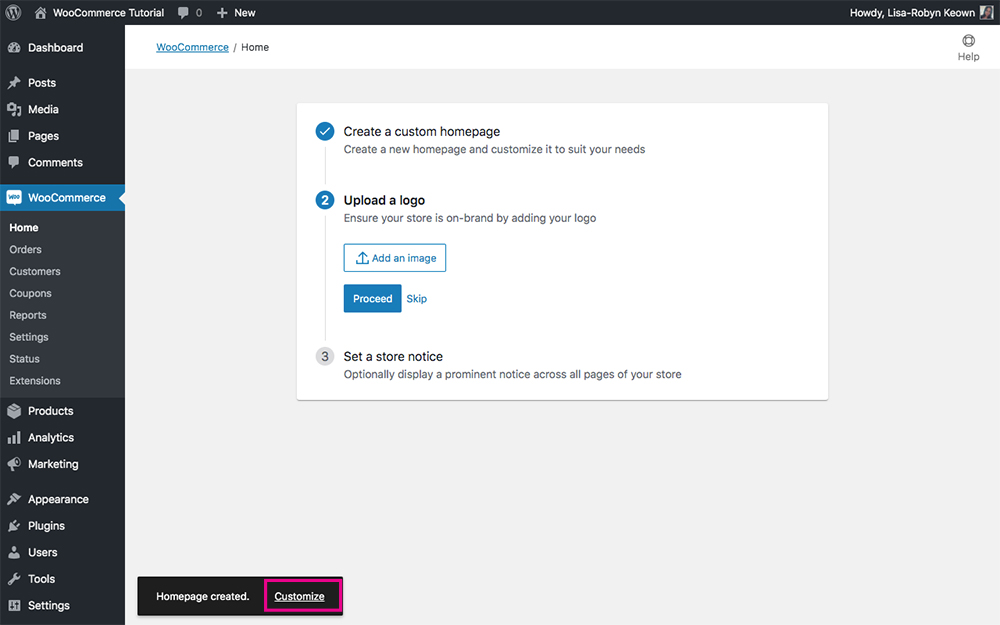
Customize your online store
This will take you to the Pages console of your WordPress website. Here, a Homepage would have been already created and populated for you.
For this demo, we’re using the Storefront theme, the official WooCommerce theme, so there are a few perks and shortcuts built into the development process. If you’re using an alternate theme, you won’t have the option of setting up a homepage as easily as this. Your homepage, and other supplementary pages, will be built as per the instructions of the theme you install and activate.
With the WooCommerce Storefront theme, the auto-generated homepage will display with a header followed by various product showcase sections.
Storefront is using the Gutenberg block-based editor. With this, you’re able to construct the front-end elements of your website from the back-end interface. From the Gutenberg editor, you can change text, imagery and more, and also add additional blocks to customize the Homepage look and feel further.
To view the front-end of the site, click the Preview button in the top right-hand corner.
The WordPress Storefront theme is incredibly basic but it does get the job done. If you’re looking to create a more engaging, attractive and visually interesting front-end for your website, consider browsing through the premium WooCommerce WordPress themes for your online store.
We suggest using the Divi theme as it’s incredibly powerful and versatile in the designs it’ll allow you to create. It is also really easy to use. We’ll cover WooCommerce shop template themes in more detail a bit later.
Now that you’ve created a homepage, return to the WooCommerce Home settings and continue the setup process.
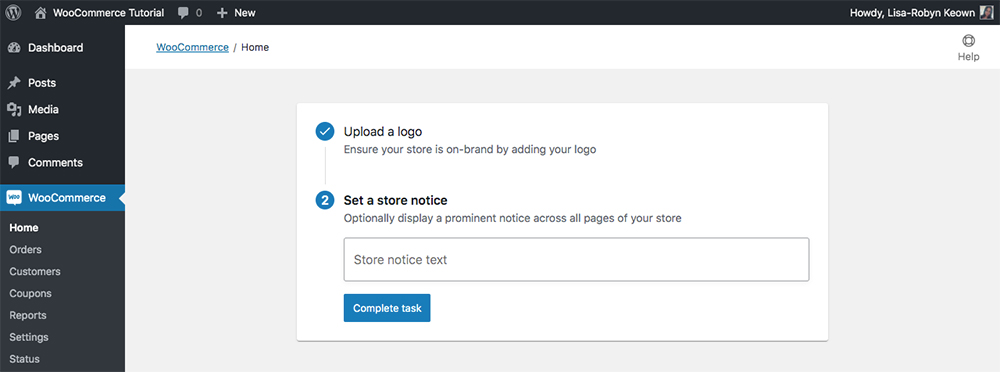
The plugin will ask you to upload a logo. If you haven’t already added a logo for your website, you can do so now. Click Proceed to add a logo to the Media Library. If you want to bypass this for now, click Skip.
Add your logo
Finally, and congratulations for coming to this final step, you’ll be asked to enter an optional store notice. This is a line of text that’ll display on countless pages across your site. It’s not compulsory so if this isn’t important to you, skip this step.
Personalize your online store
WooCommerce pages
When you install and activate the WooCommerce plugin on WordPress, it will automatically populate your site with a few key commerce pages. They are:
- Cart
- Checkout
- My Account
- Shop
These standard ecommerce pages come with generic styling. They are not particularly pretty and don’t include advanced conversion-optimized elements. If you want to customize the look, feel and form of these WooCommerce pages, you’ll need to look for a WooCommerce theme that either allows for this customization or includes some pre-styled pages. Our theme of choice, Divi, offers a certain degree of customization, but it only applies to product pages at this point.
If you’d like to create a stand-out Cart, Checkout, Account pages and similar, you’ll need to add a premade WooCommerce child theme to your website. This will give you a beautiful and unique that is conversion-focused and has a great user experience in mind. Have a look at the Cart, Account and Shop pages of our Divi and Woocommerce child theme, Divi Ecommerce.
In the next section, we’ll showcase the generic WooCommerce pages that come standard with the Storefront theme. Storefront is a good option if you don’t care much for creating a unique, on-brand shopping experience. Our top choice is Divi, teamed with a great WooCommerce Divi child theme.
Let’s take a look at each of these Storefront pages in detail and see how they all fit together.
WooCommerce Shop page
The WooCommerce shop page is the main landing page for all of your products. If you’re using the Storefront theme, your customer will be able to add a product directly to the cart from the shop page. Other themes may not have this functionality.
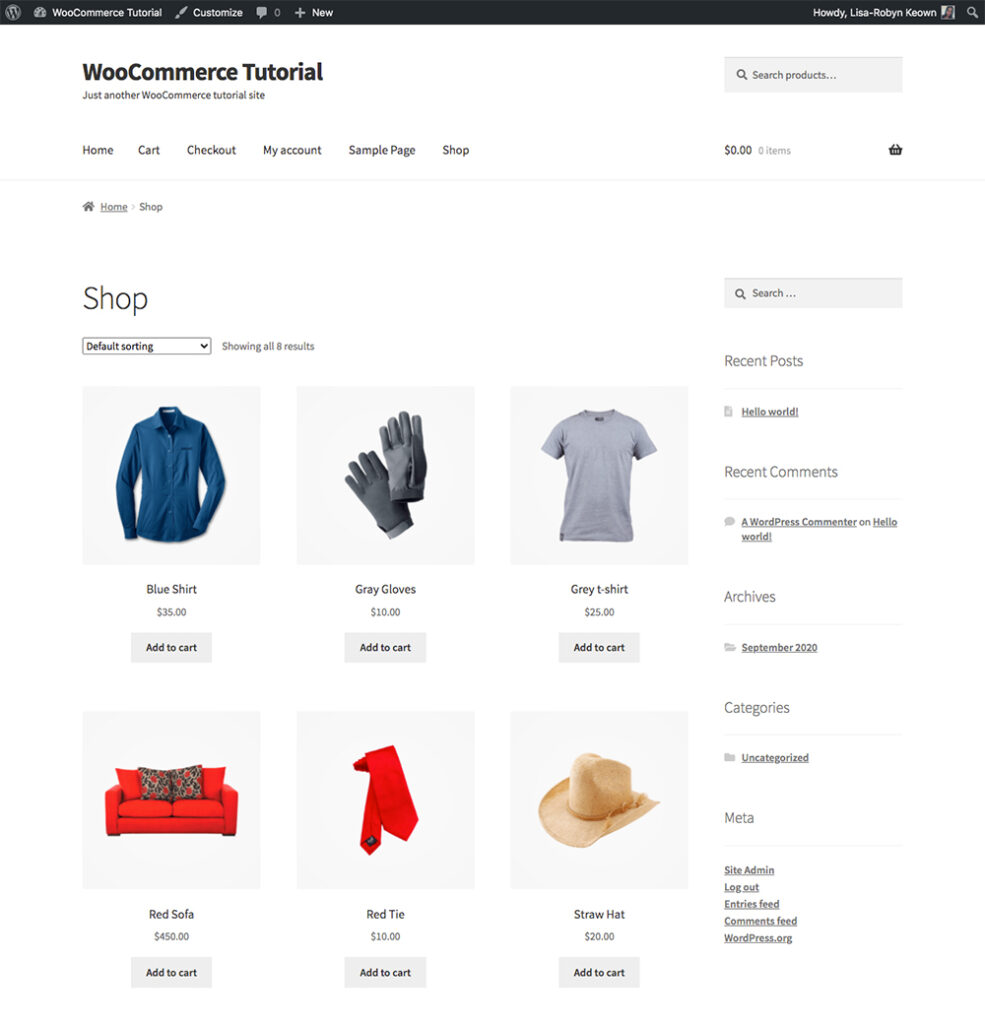
Storefront’s shop page
WooCommerce Products page
When your customer clicks into one of the products, they’ll be taken to a product page. Here they’ll find all of the information that you added to the product listing earlier, including the product image, possible gallery images and descriptions.
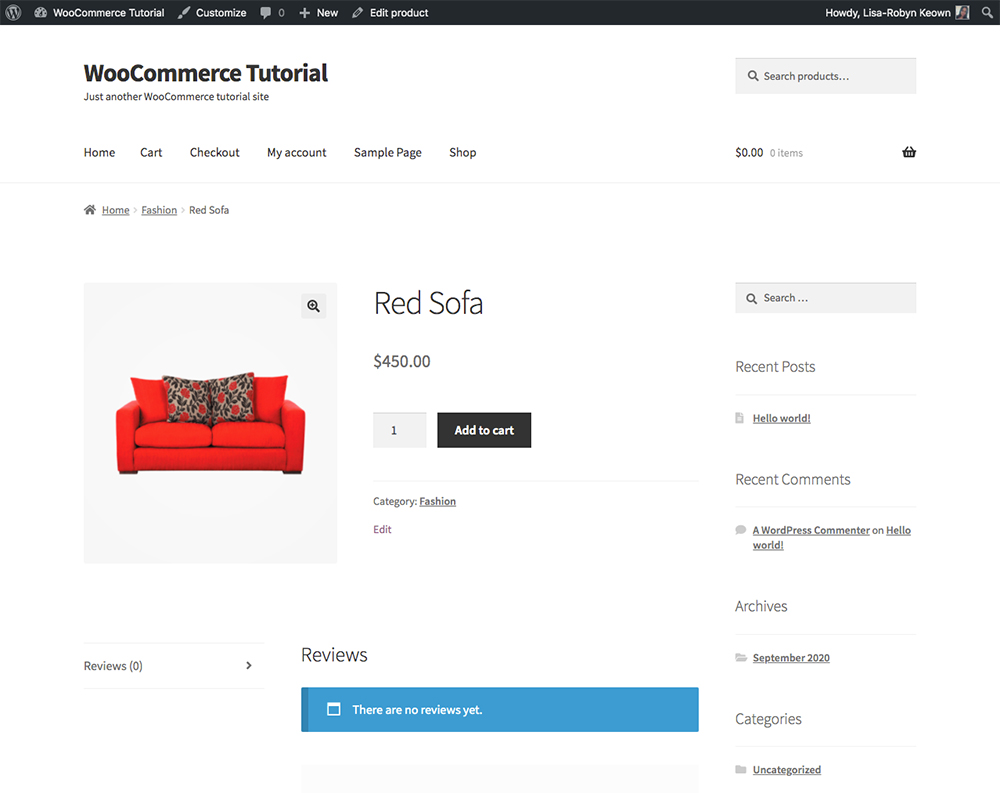
Storefront’s product page
To purchase a product, your customer will click the Add to Cart button. Once complete, a notice will display alerting them that the product has been added to the cart.
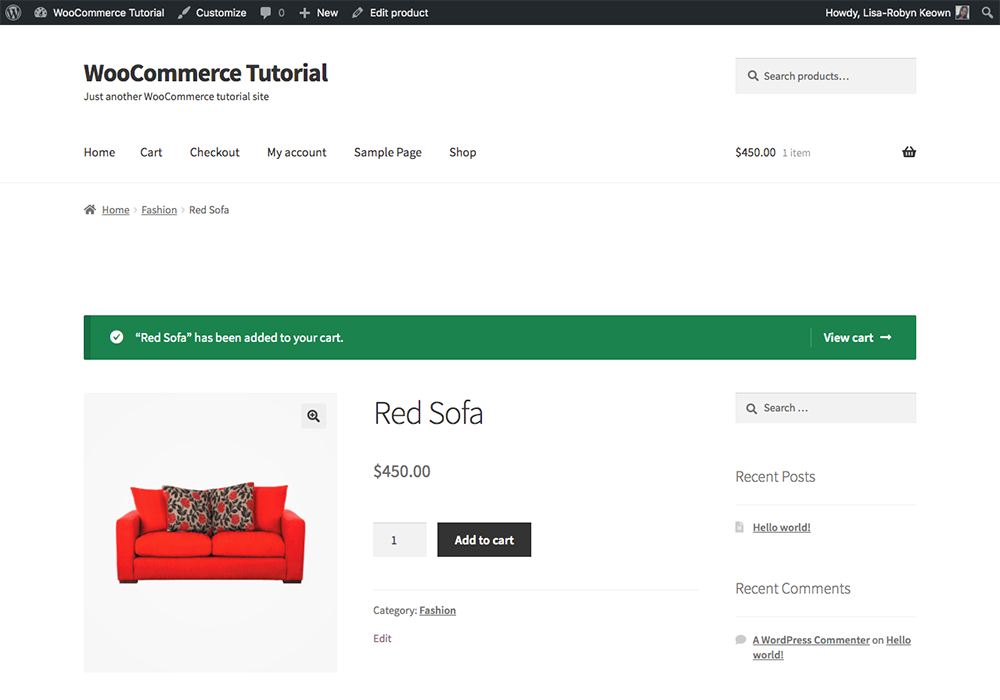
Storefront’s product added to cart alert
When your customer clicks the View Cart button, they’ll be taken to the Cart page.
WooCommerce Cart page
Within the Cart page, your customer can review their order. Here they’ll see all of the shipping fees and taxes relating to their order. Remember, these figures and display settings can all be changed in the WooCommerce Settings > Tax and Shipping tabs, as demonstrated earlier in this tutorial.

Storefront’s cart page
WooCommerce Checkout page
Finally, your customer will arrive at the Checkout page. Here, they can enter their delivery details and make payment for their order. For this demo, I’ve set up a payment gateway via PayPal.
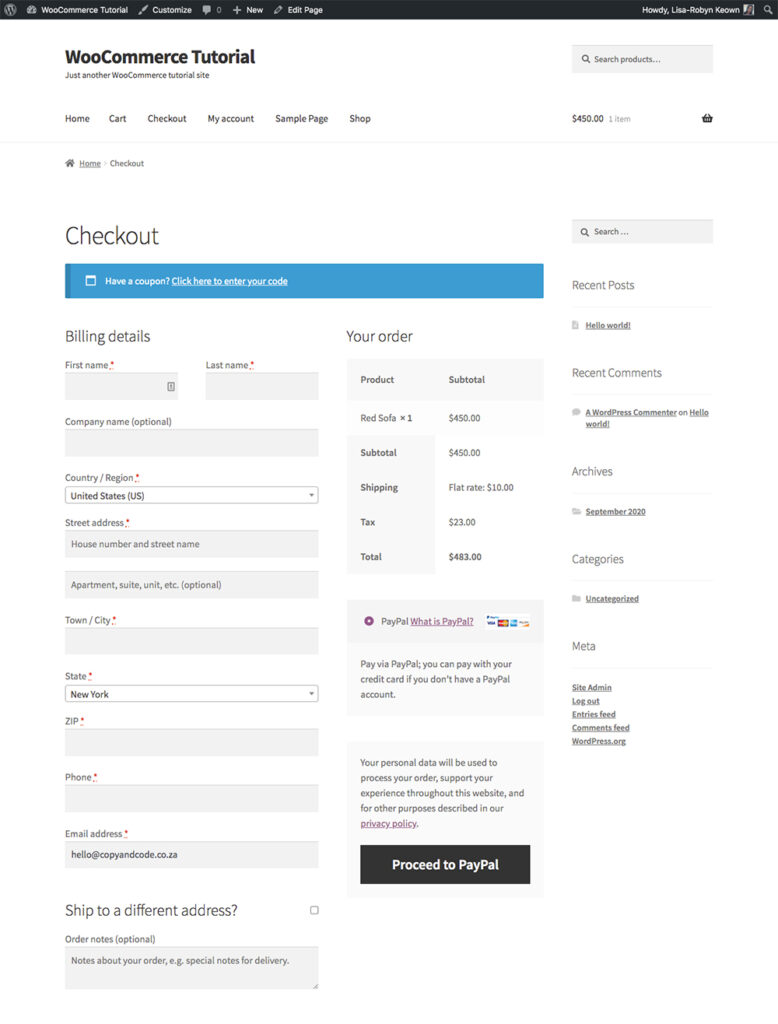
Storefront’s checkout page
WooCommerce My Account pages
Once your customer completes a payment, they’ll have access to the My Account pages. Here, they’re able to track their orders, view their downloads and manage their account details.
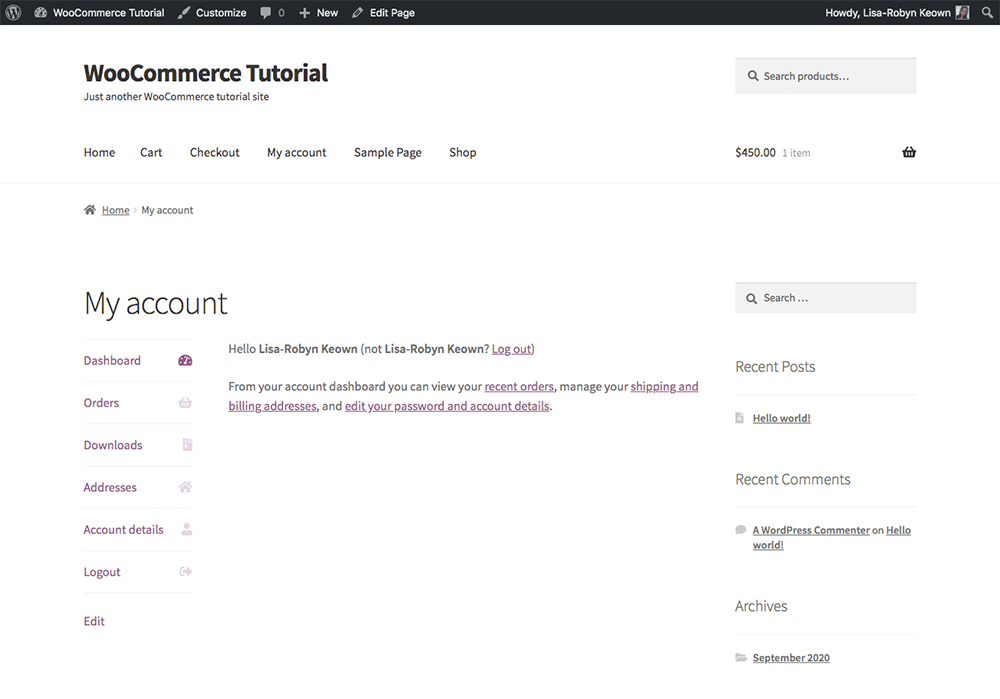
Storefront’s My Account page
WooCommerce plugin settings
At this point, you have a fully-functional online store set up and running. You’re able to make sales, receive money and grow your income.
To make sure you fully understand all of the plugin settings in WooCommerce, here’s a quick run-through of each of the WooCommerce menu items.
WooCommerce menu
WooCommerce Home page
First, the WooCommerce menu, beginning with the WooCommerce home page.
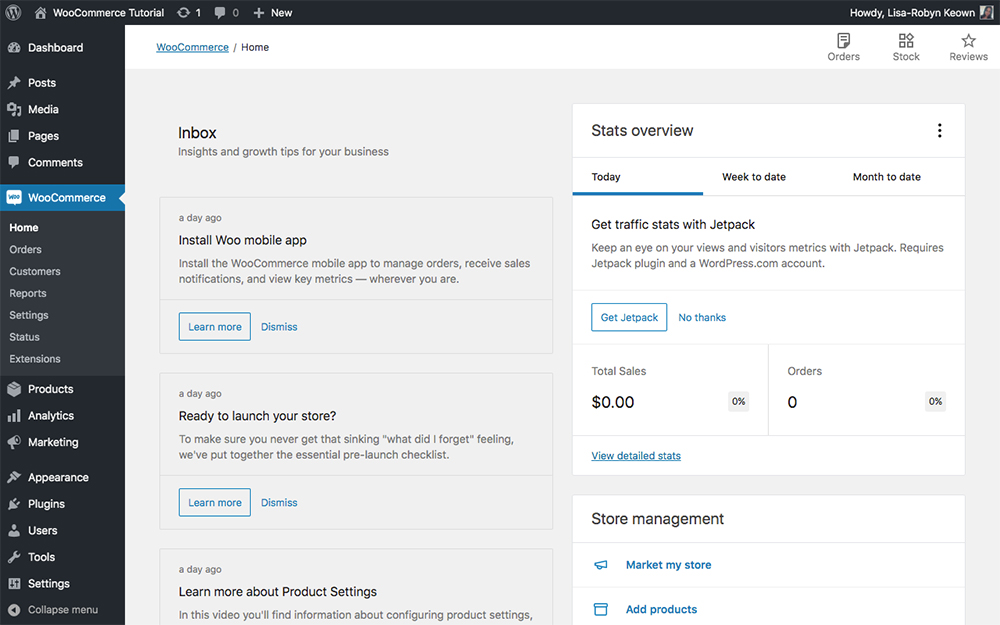
Overview of the WooCommerce plugin menu
Here, you’ll find an overview of the latest happenings in your store. You’ll find tips and tutorials and a few extra integrations for WooCommerce.com or Jetpack users.
WooCommerce Orders page
This section is used to view and manage all orders in the store. At the moment, there are no orders on this demo site so it looks a bit bare.
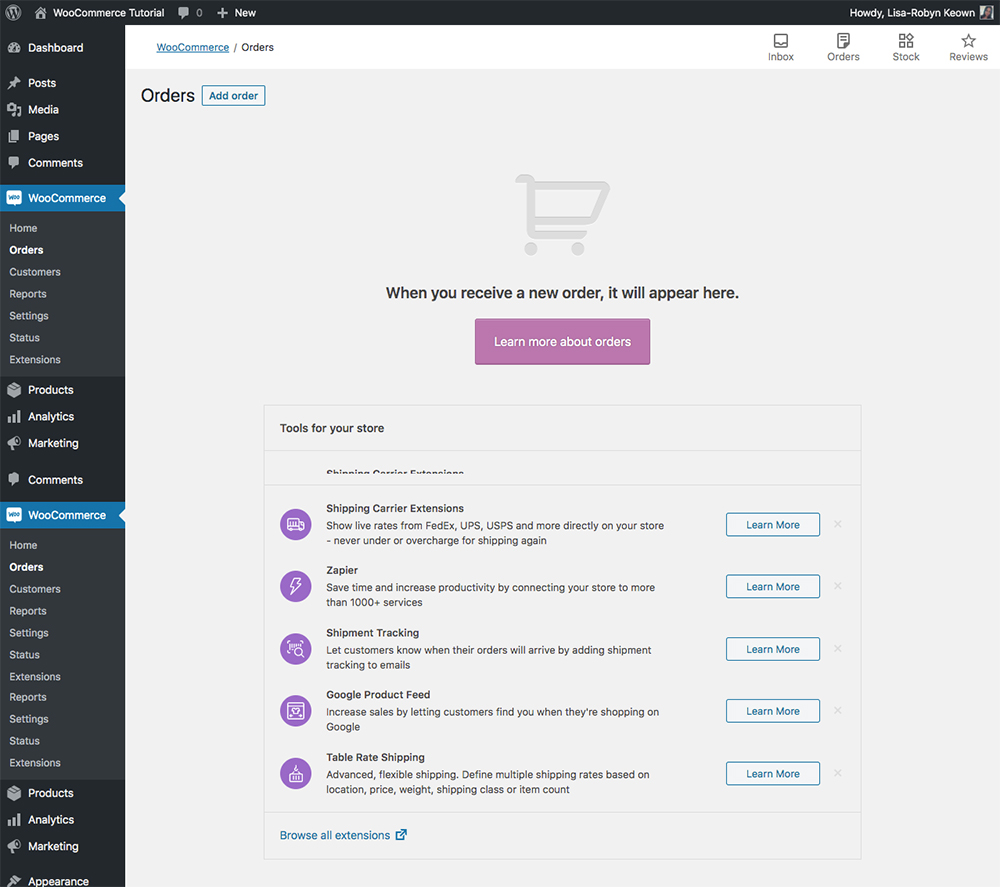
Overview of the WooCommerce Orders menu
WooCommerce Customers page
The WooCommerce customer page will show a database of all customers who have purchased from you. You’ll be able to see their name, contact information, number of purchases and other particulars.

Overview of the WooCommerce Customers menu
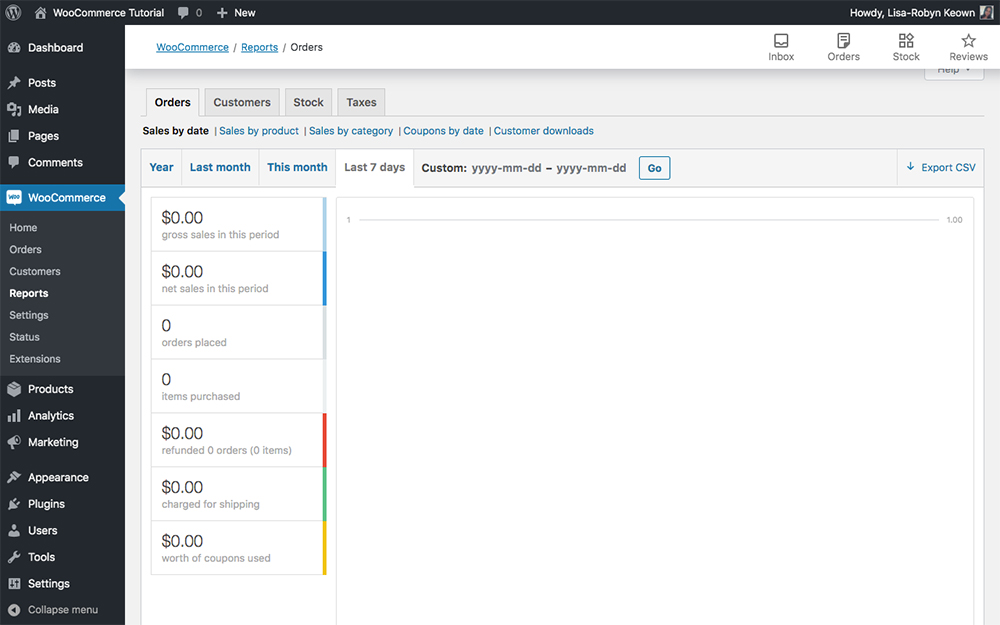
WooCommerce Reports page
Here, you can find data and reports relating to your online store. Data, that will accumulate over time, will give you detailed information on your orders, customers and stock. You also can find more detailed data and statistics in the WooCommerce > Analytics menu.
Overview of the WooCommerce Reports menu
WooCommerce Settings page
The WooCommerce Settings page has several tabs used to configure the store’s set up and performance.
The tabs include:
- General: Basic information about your store including the address, selling location and shipping location.
- Products: Information about products including measurement units, review and ratings settings as well as Shop and Cart page functions.
- Tax: Setting taxation rates.
- Shipping: Configuration of shipping details including zones, methods and rates.
- Payments: Integration of payment gateways.
- Accounts & Privacy: Settings relating to privacy policies, data and guest checkout.
- Emails: Settings and customization of all emails relating to your online store.
- Integration: Establish integration with MaxMind for Geolocation services.
- Advanced: Change the WooCommerce defaults and enable various hooks and APIs.
WooCommerce Status page
This is used for technical troubleshooting. If you have come to a problem in your store, you can check the various options in the Status menu for a possible solution.
Reviewing the Logs or assessing the System Status Report will give you a good idea of what may be wrong. These reports can be sent to the WooCommerce technical support team for professional WooCommerce help.
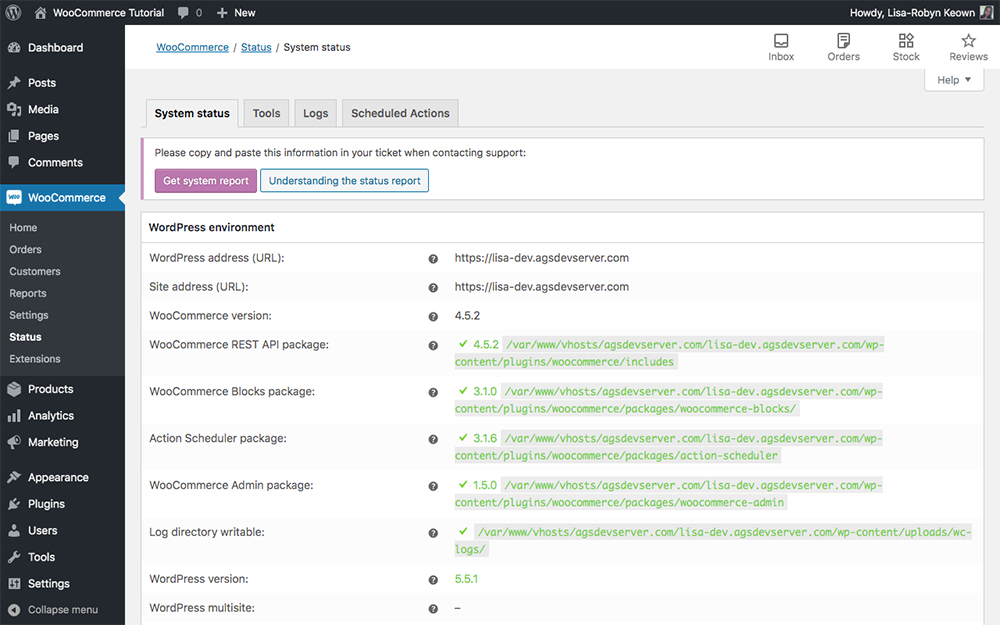
Overview of the WooCommerce Status menu
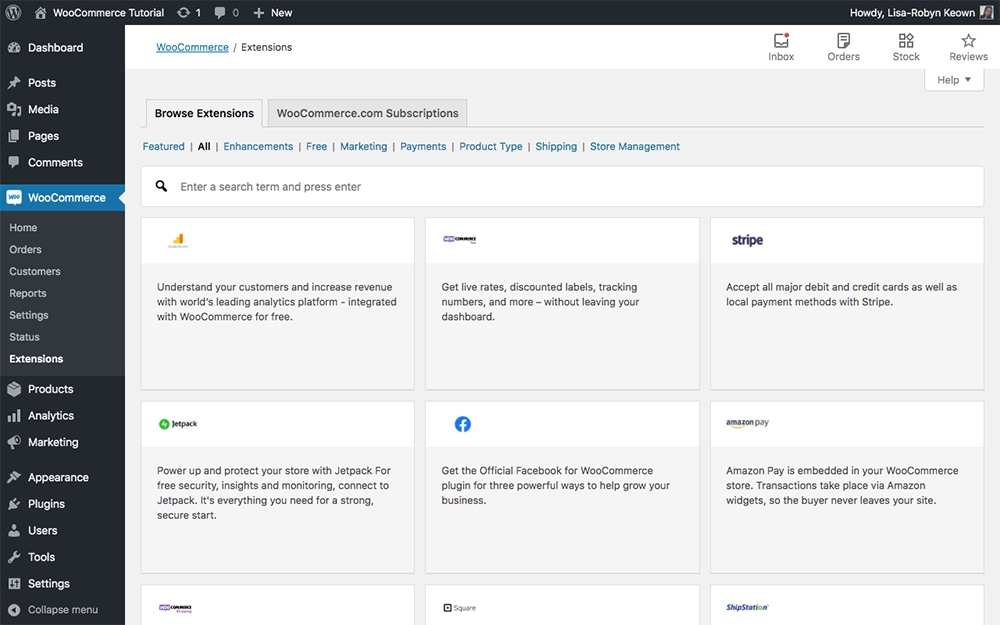
WooCommerce Extensions page
WooCommerce is a great, robust eCommerce solution out of the box, but the functionality of this platform really comes to life when extensions are added to the mix. There are both free and premium extensions available for WooCommerce. We’ll cover these in a bit more detail later.
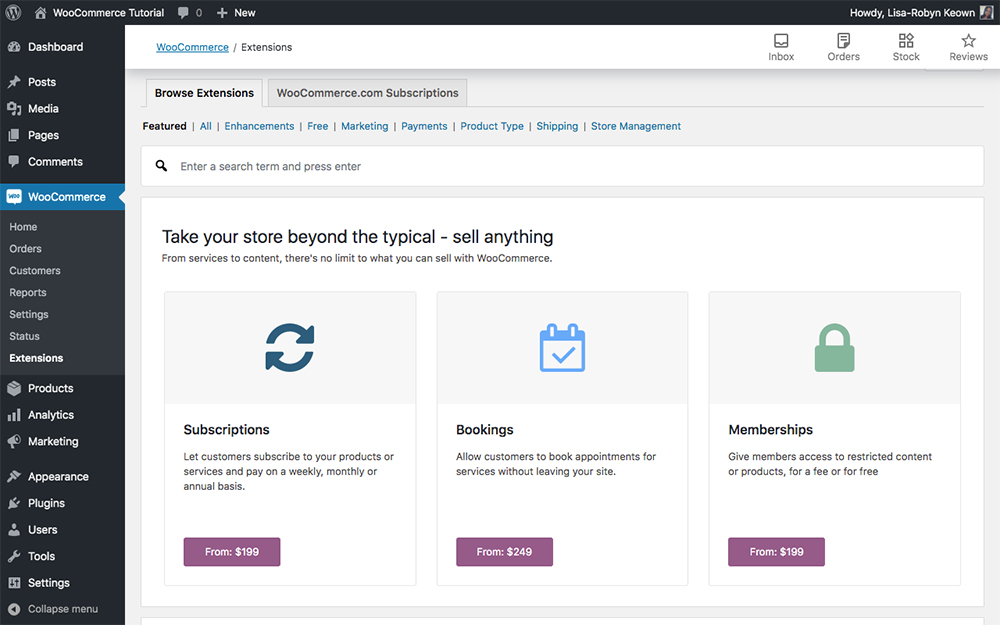
Overview of the WooCommerce Extensions menu
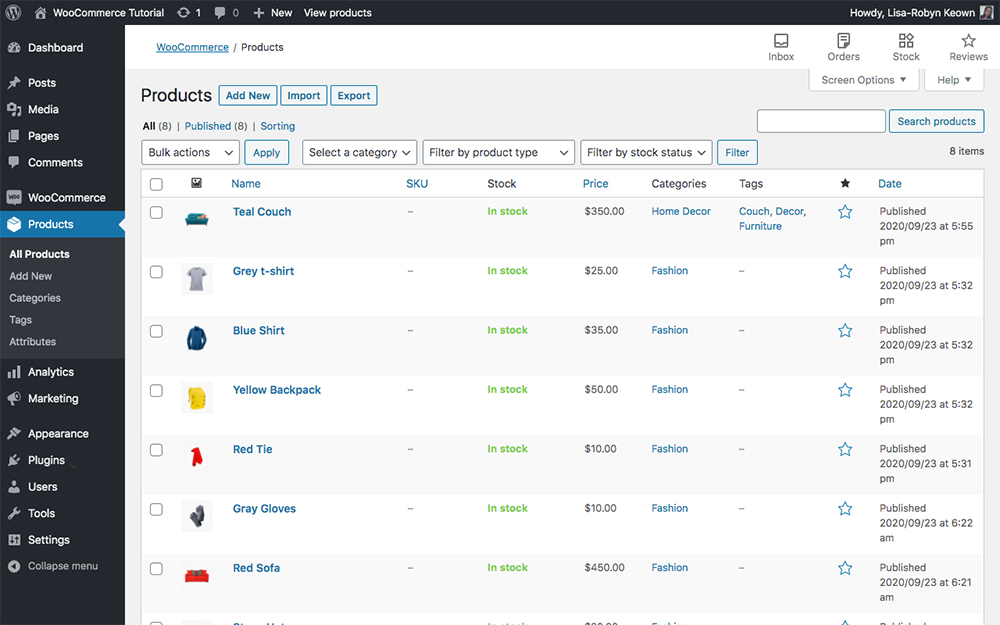
Get an overview of all of your products
Next on the list is the WooCommerce Products menu. We’ve covered this extensively earlier in the tutorial while demonstrating the process of adding a product.
Get an overview of all of your products
To recap:
- All Products: A dashboard that lets you view and manage all of the products added to your online store.
- Add New: Editor that lets you add a new product to your store.
- Categories: Dashboard for adding and managing product categories.
- Tags: Dashboard for adding and managing product tags.
- Attributes: Dashboard for adding and managing product attributes for product variations.
WooCommerce Analytics menu
In an effort to help store managers amp up their online selling strategies, the team at WooCommerce brought analytics and data reporting on-site.
Before, WooCommerece’s data reports were quite basic and bland, now, with the new Analytics reporting, store managers can now get valuable sales, stock and performance insights directly from within their website.
Within the WooCommerce Analytics menu, there are a number of interesting data sets and reporting tools all geared to help eCommerce entrepreneurs engineer their offering towards increased profits. All of the reports can be exported into CSV files and manipulated offsite in data management tools.
The first menu item is Overview. It’s a customizable dashboard that’ll give you a snapshot look at your online store and its performance. As this is a brand new site installation with demo content, there isn’t any pre-existing sales or data just yet.
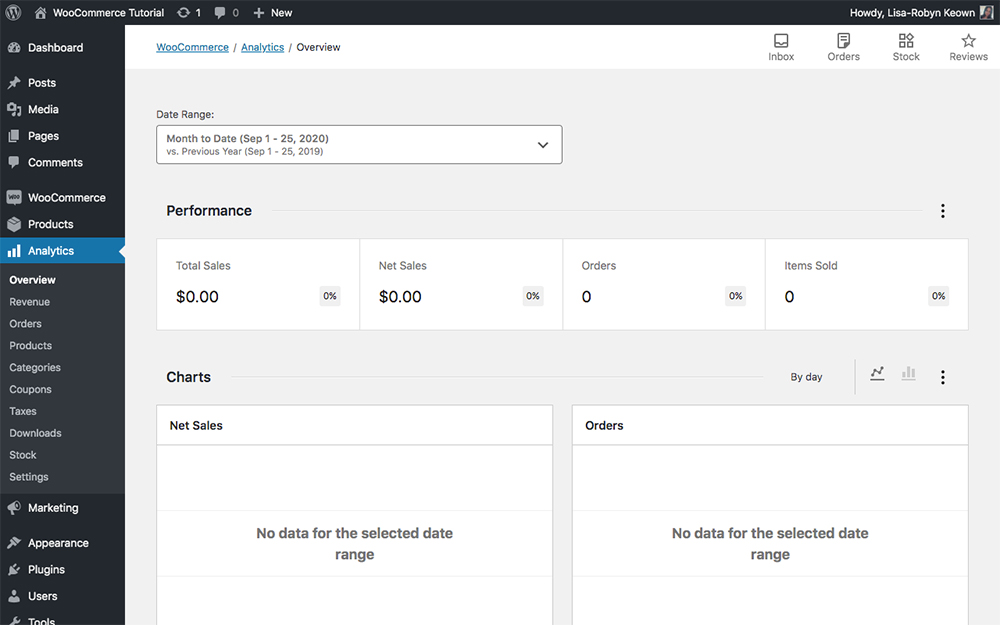
Explore the various WooCommerce Analytics menus
Each of the report types in the Analytics menu function in very similar ways. You’ll have the option of selecting a date range, either from an existing range prompt such as today, yesterday, last week, last month and so on, or you can specify a custom date range. Once a time period has been specified, WooCommerce will generate a data report of the set time period.
The interfaces of each of the menu items are practically identical but they’ll report on different variables. They include:
- Revenue: Reports based on the revenue of your store.
- Orders: Reports based on orders placed via your store.
- Products: Reports generating sales performance data of products in your store.
- Categories: Reports based on the various categories in your store.
- Coupons: Reports on coupon data including individual usage and comparisons.
- Taxes: Reports on all taxes collected by your store.
- Downloads: Reports related to downloadable items in your store.
- Stock: Reports on the stock inventory of your store. This report is only applicable to stores with stock management enabled
The last menu item Settings is the main configuration hub for these reports. Here, you can set a few defaults for the reports you generate including a default date range and more.
WooCommerce Marketing menu
A more recent feature in the latest version of Woocommerce is the Marketing Hub, accessed via the WooCommerce > Marketing menu.
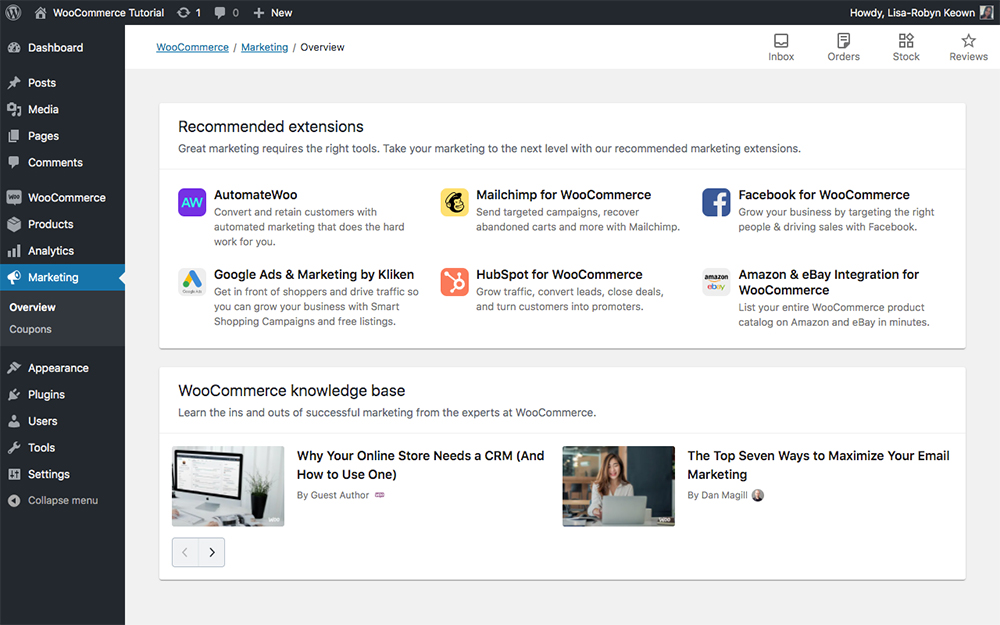
View the WooCommerce marketing options
This is an effort from the team that WooCommerce to help eCommerce store owners implement improved marketing strategies directly from the store itself.
Here you’ll find recommended extensions and articles from the WooCommerce knowledge base that’ll share marketing tips and eCommerce management solutions.
Also within the marketing meu, you’ll find Coupons.
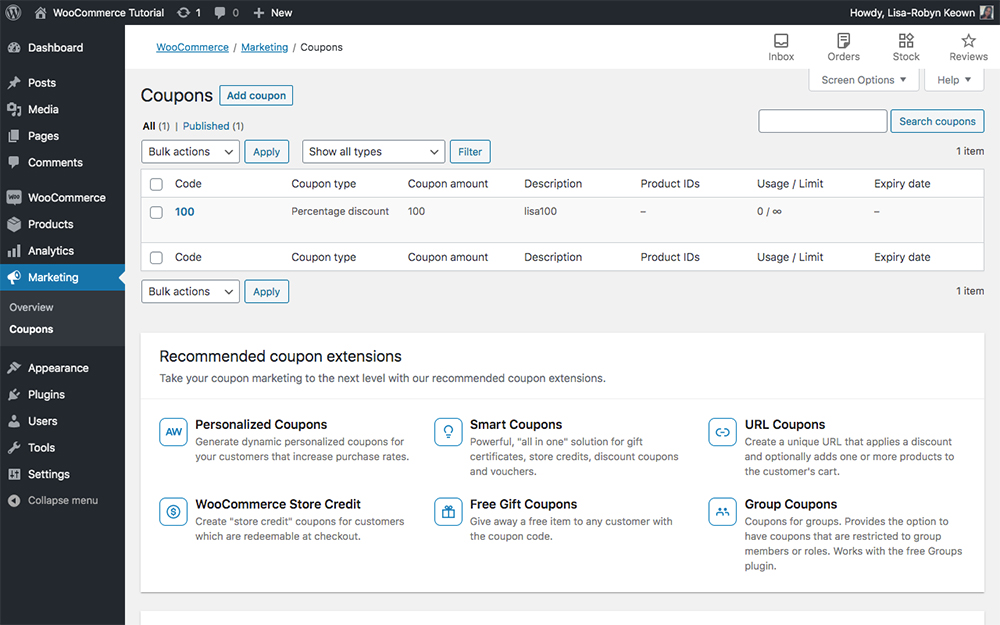
Manage your coupons
Through the Coupons dashboard, you can create and manage various coupons for your customers. For example, you may be running a promotion and are offering 25% discounts site-wide, or perhaps you are giving a coupon to a loyal customer to thank them for their support.
Through the Coupons editor, you can decide whether your coupons:
- Have a discount of a set numeric value or percentage
- Allow for free shipping
- Have a set expiry date
- Include specific usage restrictions or limitations
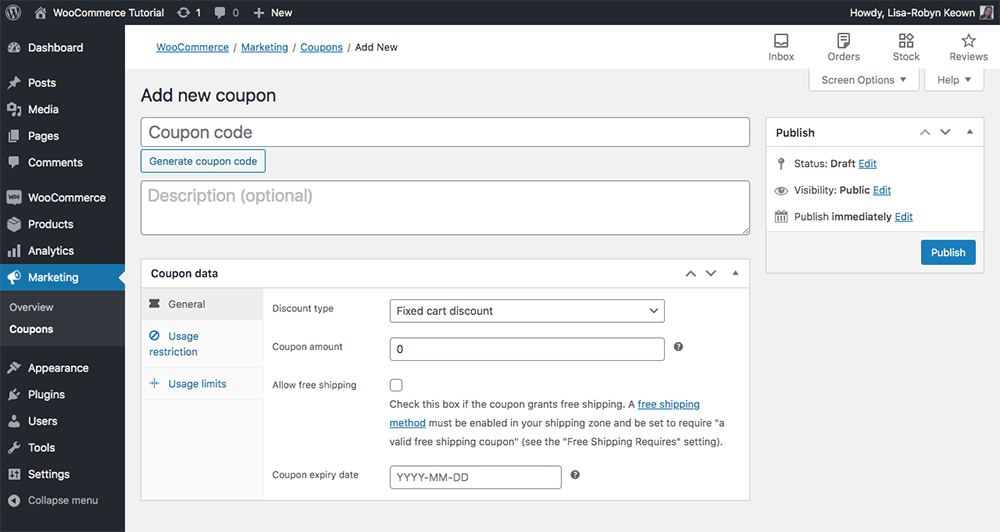
Create a new coupon
Now that we have fully covered everything related to the WooCommerce plugin, from installing the plugin, adding products, configuring an online store, and understanding each and every plugin setting, we can move onto discussing themes and extensions.
WooCommerce themes
Throughout this WooCommerce tutorial, we have used the default WooCommerce theme, Storefront. As you may have noticed, it’s quite bland and boring, but it does get the job done. If you’re looking for a simple and straight-to-the-point theme without much spice or flavor, Storefront is an okay option.
If you want to create a truly memorable and unique online store, one that not only functions and performs well, but looks good too, then you may want to consider using a premium WooCommerce theme.
Premium WooCommerce and WordPress themes have been designed by professionals, adhere to the latest best web design practices and include various on-trend sections.
There are thousands of WordPress themes readily available, and while WooCommerce will work with any WordPress theme, we suggest selecting one that is WooCommerce-ready.
Tips for choosing a WooCommerce-ready theme
With so many themes on the market, choosing a WooCommerce-ready WordPress theme can be challenging. Here are some tips:
- Make sure it is responsive. Most online shoppers are using their mobile devices to purchase items online. It’s imperative that your theme will display favorably across all devices.
- Only download themes from reputable sources. If you are using a free theme, make sure you download it from the wordpress.org repository or from within your website itself, via the Appearance > Themes console. If you are purchasing a theme, make sure it is from an official, reputable store, either a theme seller such as Envato Market or directly from an agency such as Elegant Themes. Downloading themes from dodgy sources can result in poorly developed theme packages or possibly files with malware injections.
- While browsing the options available to you, consider whether the design of each theme you’re assessing aligns with your brand identity. If you need to change the theme to fit your brand colors and type suite, make sure it’s easy to customize. If you’re not set on your brand look and feel just yet, opt for a WooCommerce-ready theme that is simple and uncluttered, as this will give you room to grow after you’ve set up your store.
Here are some of the top-rated WooCommerce-ready WordPress themes:
Divi
The Divi theme is our top choice for building a WooCommerce website. Divi is a page builder, so unlike other themes on this list, which are set theme packages, Divi employs a visual drag-and-drop builder that lets you assemble a page from an array of available elements or modules.
If you’re looking to build a custom product page, Divi’s drag and drop builder will work perfectly. However, if you’d like to create a custom look and feel for the Cart, Checkout, Category and Account pages in WooCommerce, you’ll need an add-on like the Divi Shop Builder for extending Divi’s drag and drop builder to all your WooCommerce pages, or you can get crafty with CSS and custom style these pages in your child theme’s stylesheet.
If you’re looking to bypass the CSS styling, opt for using DIvi in conjunction with a WooCommerce child theme, such as Divi Ecommerce or Divi Ecommerce Pro.
WooCommerce tutorial Divi theme page builder
With the Divi Builder, you can use this drag-and-drop page building functionality for WooCommerce pages (product, cart and checkout pages). This is really impressive as typically, changing even small details on the WooCommerce pages required editing the PHP files and working with code. Here’s a great video that showcases the power of the builder when used to build Divi WooCommerce product pages.
If you’d like to give Divi a test drive, you can check out a live demo of the page builder.
Here are a few examples of the incredible Divi WooCommerce designs you can create.
Divi Ecommerce child theme
This is an example of the home page from our child theme Divi Ecommerce.
Divi Ecommerce is a beautifully designed child theme made for use with Divi and WooCommerce. This theme works in conjunction with the Divi theme, so you’d need to purchase both an Elegant Themes membership and Divi Ecommerce child theme.
Plus, you can extend that functionality with other add-on modules like the Product Carousel for Divi and WooCommerce. Add product carousels anywhere you use the Divi builder and customize every element with the drag-and-drop editor.
You can view a live demo of Divi eCommerce and buy the child theme via our store.
Elegant Themes layout packs
Elegant Themes, the company behind the Divi theme, have created a collection of beautifully designed, ready to use layout packs for Divi users. These use various modules in the theme package, such as the Divi shop module, to construct stand-out and attractive WooCommerce pages. You can view all of the designs in the Divi layouts library.
Here’s an example of a layout used to create a pet food supply company.
Here is another example of an Elegant Themes layout for Divi. This layout for a beauty brand uses the Divi builder to create a totally unique and edgy WooCommerce product page.
WooCommerce out of the box has a satisfactory product page layout, but it’s a bit tired and overdone. What’s so great about the Divi theme is that you can use the page builder and create a truly custom layout unlike anything else on the internet.
Other top-selling WooCommerce-ready WordPress themes include:
WooCommerce extensions
Finally, we’ve come to the last section of our WooCommerce tutorial. In this section, I’ll discuss WooCommerce extensions and how you can use them to take your WooCommerce store to new heights.
Expand the functionality of your WooCommerce store with WooCommerce Extensions
What is a WooCommerce extension?
WooCommerce as-is is a great plugin that’ll certainly take your website from a standard display site to a more-than-capable online store. You have everything you need to get started selling products and making a profit with the standard WooCommerce suite.
However, if you’re looking to implement a slightly custom function or want to give your customers a bit of a different online shopping experience, you can tap into the world of WooCommerce extensions to expand the functionality of your store.
With a WooCommerce extension you can expand your website and online store to, for example, include a membership, add a subscription mode, include advanced payment options and much more.
Browse all WooCommerce extensions
WooCommerce extensions are similar to WordPress plugins. They can be for aesthetic purposes, changing the look and feel of the front-end of a site, or they can be functional, adding a different complexity or process to the back-end.
WooCommerce extensions come in both free and premium versions, so depending on what it is that you’re trying to achieve, remember to budget a bit for extensions if need be.
If you’re curious about the available extensions, look at the WooCommerce store first and browse the offers on display. As the WooCommerce team creates these extensions, you can rest assured knowing they’re top quality. You can also find extensions via marketplaces such as Code Canyon, or via third-party developers.
How to install a WooCommerce extension
WooCommerce extensions are added a bit differently to WordPress themes and plugins. If you want to use extensions from WooCommerce itself, you’ll need to create a WordPress.com account and then log into the WooCommerce main site. Even if you try and buy an extension from within the WooCommerce > Extensions menu, you’ll still be directed to the WordPress site to create an account.
If you’re confused about the difference between WordPress.com and WordPress.org, read this.
Once you’ve created a WordPress account, logged in and selected an extension, you can either download or purchase the extension of choice.
Once you’ve completed this step, return to our WordPress website, navigate to WooCommerce > Extensions > WooCommerce.com Subscriptions and connect your WordPress/WooCommerce account. Now you’ll be able to manage your extension from within your website.

Connect WooCommerce.com subscriptions
Top WooCommerce extensions
As mentioned before, there are thousands of WooCommerce extensions readily available for you to download. The extensions you choose to download or purchase will depend on the functionality you’re trying to add to your online store.
Here are a few of the most popular or commonly used extensions for WooCommerce.
- Product Sales Report Pro for WooCommerce: Take the pain out of sales reporting. With Product Sales Report Pro, you can quickly create sales reports for your WooCommerce store to be able to make smart, strategic decisions about inventory, marketing strategies and promotions.
- Export Order Items Pro for WooCommerce: Need to find bulk information about a batch of orders? Now you can generate detailed reports that declare the status of your orders. Reports export in an array of formats, and are easy enough for a human to understand and a system to process.
- Frontend Reports for WooCommerce: Great for WooCommerce store managers who want instant access to see sales metrics, Frontend Reports for WooCommerce displays sales-related data on the frontend of a website. No need to manually generate a report or wait for an email.
- Scheduled Email Reports for WooCommerce: Don’t waste time manually generating sales reports for your online store. With Scheduled Email Reports for WooCommerce, you can automate your sales reporting to be sent via email. Periodically, you’ll automatically receive an email with a sales report attached.
- WooCommerce and Zoho CRM Connector Pro: Now you can connect your WordPress website, WooCommerce store and Zoho CRM to create a seamless, flawless experience. Track customers who have purchased from your WooCommerce store as leads in your Zoho CRM, and nurture them from there.
- Potent Donations for WooCommerce: Perfect for non-profit organizations, Potent Donations for WooCommerce is designed to help brands generate donations fr their causes. Now you can quickly and easily accept contributions from site visitors and donors.
- Divi Design: If you use the Divi theme, you’ll be pleased to know that there are several WooCommerce-ready themes and plugins designed specifically for use with Divi. WooCommerce compatible Divi child themes such as Divi Ecommerce, Divi Ecommerce Pro and Divi WooCommerce Store will help you get an online store up and running in no time. Divi-specific WooCommerce plugins like Divi Shop Builder and Product Carousel for Divi and WooCommerce will help you extend Divi and WooCommerce even further in new and exciting ways.
- WhatsApp Chat and Share for WordPress / WooCommerce: Offer your customer the chance to connect with you on WhatsApp. WhatsApp for Business has become a popular channel for customers to communicate with brands, so if aligned with your customer contact points, this extension may be perfect for you.
- Product Bundles: Great for stores that have loads of products that can fit together, the Product Bundles extension lets you create package deals from existing products that can be marketed as a new whole. This is ideal for store owners who want to sell in bulk or sell related products as a unit for a discounted price.
- WooCommerce One Page Shopping: Shorten the purchase process for your customers and improve the user experience of your store. Instead of splitting the payment process into multiple steps, this extension allows you to combine multiple pages into one, letting your customer secure a purchase and make payment in rapid speed. As soon as the customer adds a product to their cart, the checkout fields will display immediately.
- WooCommerce Better Variations: A simple plugin that packs a punch, WooCommerce Better Variations gives you more control over your variable products by alerting customers as to which items are out of stock. To keep your customers’ attention the extension also lets you include a restock date which alerts the customers as to when they should return to your store to purchase.
- YITH WooCommerce Wishlist: Let your customers mark their favorite products and share it with their family and friends. This is brilliant for holiday promotions.
- WooCommerce Currency Switcher: Display and change between various currencies in your online store.
- WooCommerce Waitlist: Don’t let out of stock products cost you sales. Let your customers set up an email alert for when a product is restocked.
- YITH WooCommerce Ajax Search: Brilliant for improving user experience, this extension lets you enable an easy to use search feature that runs using ajax. Search functionalities can be placed anywhere in an online store through a widgetized search bar.
- Bookings and Appointments: If you want to offer your customers the opportunity to make a booking or create an appointment, this extension is for you.
One final tool to mention is Zapier. Zapier is not a WooCommerce extension, but it offers a world of automation opportunities that can make the process of running a WooCommerce shop smoother.
Zapier connects two pieces of software together to create a workflow. Once an event is actioned on one software suite, a trigger is set off, which in turn activates a second action to run. Zapier can connect the WooCommerce plugin to a range of other tools, setting automatic processes into play so that online store owners can get more done.
Some examples of Zapier automations for WooCommerce can include:
- As soon as a customer purchases a product, automatically add them into your email marketing service provider (Mailchimp, Get Response, MailerLite, Active Campaign) to either send them a welcome email or begin a welcome or onboarding sequence.
- After a sale is complete, automatically generate an invoice for the customer via an accounting tool (Xero, Quickbooks, Zoho Books).
- As soon as a customer’s order status changes, for example from awaiting dispatch to dispatch, automatically send their contact number a text message to alert them of the delivery progress.
With Zapier, there is a world of opportunities for automation and time-saving at your fingertips. Zapier is extremely cost-effective, and the first free ‘zaps’ or automation are free.
Ending thoughts
Once you’ve finished reading this guide, you will be fully equipped to build, deploy and manage an online store. You would have learned everything there is to know about WooCommerce and setting up and managing an online store with WordPress. You should feel confident in taking the next steps toward becoming an eCommerce entrepreneur.
If ever you get stuck, the WooCommerce support team is extremely helpful and knowledgeable, and they’ll respond to your query quickly.
We’re so excited to see what you create, which products or services you’ll start selling, and how you’re planning to take over the eCommerce world.
If this guide has helped you, please let us know in the comments below. If you have any further questions about setting up or configuring WooCommerce, post your questions below!
Thanks for reading!
Recent Comments