
One of the most frequently asked topics within the various Divi-related FaceBook groups revolves around child themes. In the following blog post, I’ve tried to sum up the valid points about child themes into one concise article. Here, I’ll cover topics to best solve any queries that may arise regarding what a child theme is, when one should be used, why it is necessary for web development projects with Divi, as well as how one can be made or where one can be purchased.
Although the content in this blog post is geared towards using a child theme in conjunction with Divi by Elegant Themes, the concept of the parent-child relationship is pretty universal and does translate to other standard themes available either on the WordPress repository or through various WordPress theme stores.
For new users, the idea of using a child theme might take a little while to get used to, but once the core concepts sink in, the ins and outs of using a child theme will become second nature. Before proceeding with this article, it is good to note that using a child theme with Divi is deemed as best practice, so familiarizing yourself with these concepts will definitely stand you in good steed as you continue along your web dev career.
Sure, if you’re not intending to change the core theme files, add loads of custom CSS, and are happy with the default “Made by Elegant Themes” credentials in the bottom bar of your footer, you don’t really need to worry about using a child theme. If you’re simply looking to style out a footer section with relevant credentials in the bottom bar, the Aspen Footer Editor might be a great plugin for you to utilize. If, however, you are looking to make some pretty gritty changes to your website, a child theme is essential.
To keep this blog post as simple and straightforward as possible, I’ve broken down the content into the following sections:
- What is a child theme?
- Why do I need a child theme?
- Use a child theme generator
- Use a plugin
- Purchase the Aspen Roots Child Theme
- Create your own child theme
- How do I create a child theme?
- How do I install a child theme?
- Premium child themes
So, let’s dive in!
WHAT IS A CHILD THEME?
Right, okay. Let’s unpack this a bit further.
Any theme that you purchase via a theme marketplace (such as Envato Market or Theme Forest) or from a vendor (i.e. Elegant Themes), would be deemed as a parent theme. If you’ve signed up for a membership with Elegant Themes (welcome to the family) and have downloaded and installed Divi (welcome to the world of easy, breezy web builds), then Divi itself will be the parent theme. A child theme can either be created (more on this later) or bought from a premium child theme developer (also, more on this later).
A parent theme is intricately developed by a team of code geniuses and comes fully packaged with all of the relevant code and WordPress-ready functionality.
A child theme is a separate entity to the parent theme that can be created or purchased via third-party developers.
A child theme uses a series of various .php functions and WordPress optimized commands and hooks to call on the full functionality of the parent theme. This process is called enqueueing the parent theme, which basically means that the child inherits its exact same functionality and essentially “piggybacks” off of it. When WordPress runs, it looks first to the files present in the child theme and executes the code it finds. If the files are not present in the child theme, it executes the content found in the parent theme. With this, if you made changes to the header.php or footer.php file within a child theme, WordPress would execute the code found in the child theme. The only file that WordPress doesn’t prioritize child over parent for, is the functions.php file. In this regard, WordPress executes the code found in both files.
Using a blank child theme (comprised of a series of TextEditor files) which merely enqueue the relevant functions, and ensures that the WordPress website runs as per normal. Web designers and developers are able to take this step further. They are able to give the child theme a multi-layered identity by adding code or script into the various TextEditor files that make up the child theme. These edits might include CSS styling for aesthetic customizations, or see the addition of various PHP functions or .php files to include special functionality to the website.
Although the child theme is given the space to take on a life of its own, it still only exists because of the parent theme, and only works if the relationship is set up correctly. This is why enqueueing the relevant functions must be done so with care, or, left to those who are better skilled in the field.
So, why actually bother creating and running a child theme in the first place?
WHY DO I NEED TO USE A CHILD THEME?
- You might break something in the code, and
- Theme updates will wipe out all of your edits.
Making use of a child theme ensures that you can make site updates in a 100% fool-proof and safe manner. And too, enjoy some time-saving conveniences for your later web builds.
A WordPress theme lies within the wp-content > Themes folder on either your local host server or live server (accessible via FTP). From the WordPress backend, the same files are accessed via the Appearance > Editor console on your WordPress dashboard. If you’ve ever looked at Divi’s core theme files, you’re bound to notice the millions of lines of code. For really advanced WordPress users, editing this code might (at a push) be relatively easy, but for the general populace (who aren’t code savvy, and who WordPress and Divi were made for), these lines of scrolling code are just simply overwhelming.
Code is written in such an intricate manner that something as simple as adding a punctuation mark in the incorrect place will completly throw the entire operation off, rendering your theme – and website – broken. If you are keen to tinker around with code (be it CSS or PHP related), using a child theme will grant you this space, without creating any vulnerabilities in the core (parent) theme’s files.
At various stages along the way, development agencies will decide to update their themes. These may be massive theme version updates, or smaller ones (such as bug fixes). At times of theme updates, the development company will reassess the current version of the code for the theme, and make relevant changes or additions where deemed fit. If you have made changes to the theme’s core files, as soon as the update is complete, you’re 100% guaranteed to lose any changes that you’ve made. The only way to reinstate them is to go back through all of those lines of code and manually edit them again.
Child themes totally solve this dilemma. If updates occur to the parent theme, your child theme (running as a separate entity) will not be affected. As your child theme would have enqueued the parent theme, the relevant updated code will still reflect in the parent theme but will not overwrite any changes set within the files of your child theme. And, as it’s always good to keep your theme, plugins and WordPress versions up to date, avoiding a theme update is really not good practice.
In each of Divi’s General and Advanced Design settings, you’re able to set various aspects of each module. This is great for the majority of users who require an easy insert and edit option, but sometimes, keeping track of the small nuances set within each individual model can be a bit of a pain. For small CSS tweaks and tiny chunks of JavaScript functioning, you could make use the Divi Theme Options console, but using a child theme and the respective files (header.php, footer.php, style.css etc.) makes this process even easier.
Not only will this save quite a bit of time in design and development, but using a child theme for styling and similar will also save in page load time as your website won’t have to make database requests for code snippets. Also, you’ll also be able to save and reuse the files for later web dev projects.
Let’s say, for example, you have a particular fondness for a certain blog design or typography grouping that you’d like to carry over to a future project. Simply save that portion of the style.css file on your computer and reuse it later. Also, as editing the bottom bar of the footer section of the website does require a bit of elbow grease with a footer.php file, instead of rewriting these code lines every time, simply save a file and copy it over when necessary.
Are you sold on the idea yet? Great!
The next portion of this blog post covers how you can either create your own child theme (either via a generator or by yourself) and where you can purchase premium child themes.
HOW DO I CREATE A CHILD THEME?
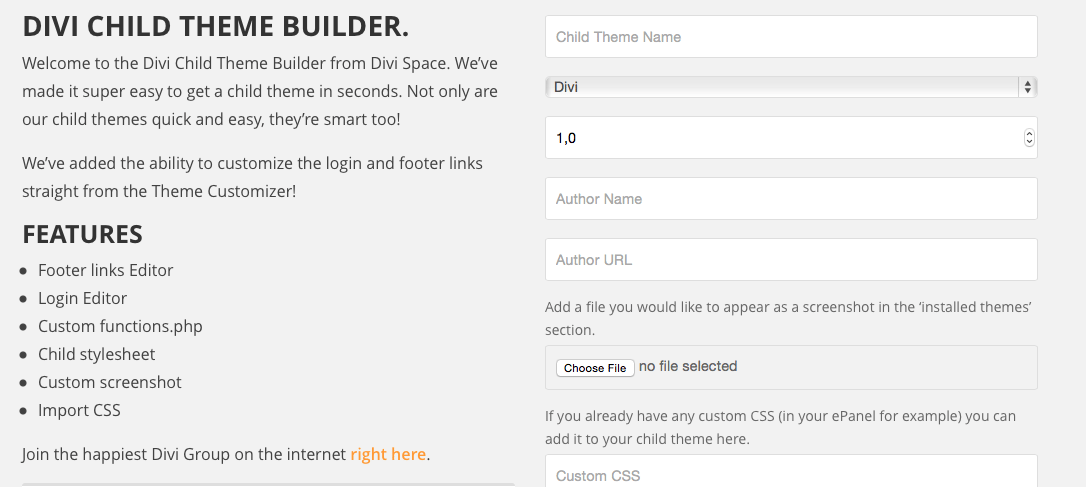
Divi Space has a great child theme generator that is incredibly easy to use. Free to use, all you have to do is enter your details in the text area boxes provided and voilà, everything (including a footer.php file with your relevant credentials) will begin to download. Once complete, simply upload the .zip file to your theme console on the WordPress dashboard, following the install and activation of the parent (Divi) theme.
To make the process even easier, you could create a child theme by using a plugin. We recommend using the Child Theme Generator plugin. After download and install, Child Theme Generator will appear as another menu item within the Settings tab on your WordPress Dashboard. Once here, simply give your child theme a new name and description and click “Create Child”. Once complete, you’ll have a blank child theme running on your Divi website.
If you’re looking for a blank child theme that offers a tremendous amount of added value, have a look at the Aspen Roots child theme.
Available for only $ 21.00, purchase the Aspen Roots child theme for Divi or Extra via the Aspen Grove Studios shop.
Note: When purchasing Aspen Roots, the download will include two .zip files (one for Divi and one for Extra). When installing the theme, make sure that you select the correct file for either your Divi or Extra website.
It’s really easy to create a child theme from scratch, so if you’re interested in exploring and understanding what goes into a child theme (i.e. which file serves which purpose etc.), it might be a good idea to try out the process and gain even more knowledge for your web development practices.
If you have an IDE (integrated development environment) or source code editor installed on your computer, all you need to do is create and save a few files. Two of the standard editors are Brackets and Sublime which are free for download, easy to use and include color cues to make code easy to script up and identify. Alternately, you could use the standard TextEdit (Mac) or TextEditor (PC), just be sure to be a bit careful with your code as small errors could cause the files to perform incorrectly.
- Create a theme directory in your website’s directory
- Create a style.css with your child theme’s information
- Screenshot
If you’re working on a local host server, navigate to the relevant folder in your directory: wp-content > themes. Here, you’ll see a folder containing all of the Divi files (installed as the parent). If you’re working on a live server, set up the folder and files and use an FTP client once complete. Create a new folder in the themes folder and name it something client-related, possibly include “child-theme” at the end of the name.
Create a theme directory
First and foremost, go to your theme directory and create a folder for your child theme. You can name it anything you wish. For simplicity, we will name our divi-child.
style.css
Create the theme stylesheet named “style.css”. Copy the code below and paste into a new IDE or TextEditor file and rename the theme name and author information based on your needs.
/*
Theme Name:   Divi Child Theme
Theme URI:    https://yourwebsite.com
Description:  Child theme, based on Divi
Author:       Your Name
Author URI:   https://thisauthor.com // Your web address
Template:     Divi
*/
Be sure to change the various details and replace with your own. The most important things to note are the “Theme Name” and “Template” sections. The Theme Name (the actual name of your child theme) becomes the display name within the Appearance > Themes of the WordPress theme selector, and Template (which must always be labeled here as ‘Divi’) tells WordPress which theme it should use as the parent.
functions.php
Open up your IDE or TextEditor (I’m using sublime). Starting with the functions.php file, either visit the WordPress Codex and copy the first PHP code block (the shorter one), or, copy the code from below. This will enqueue the parent (Divi) theme.
<?php

add_action( 'wp_enqueue_scripts', 'enqueue_parent_styles' );
function enqueue_parent_styles() {
    wp_enqueue_style( 'parent-style', get_template_directory_uri().'/style.css' );
}
?>
Paste the code into a new file and make sure to relabel the correct paths to both the parent and child theme folders. Save the file as functions.php within your child theme’s folder.
Once you have amended all of the above details to fit your deliverables, save the file as functions.php within the child theme folder.
screenshot.jpg
It’s recommended to add an image of your or your client’s logo (or similar) into the child theme folder. Save the image (880 x 660px) as “screenshot.jpg” and include it with the functions.php and style.css in the folder. When your child theme is installed and activated, this image will display as the graphic in the Appearance > Themes section of the theme selector.
For a more detailed description and step-by-step guide explaining the process of making a child theme, read the following blog post by Elegant Themes.
* Just a quick note, the Elegant Themes blog post makes use of the @import method placed within the style.css (just below the WordPress standardized stylesheet header) to enqueue the parent theme. As suggested by the WordPress Codex, the @import method is no longer deemed as best practice due to page load time, and users are advised to create and make use of a functions.php file. When you get to this step, create a functions.php and copy the relevant code as listed above.
If you get stuck or have further interest in the topic, visit the WordPress Codex and read through the literature on Child Themes.
HOW DO I INSTALL A CHILD THEME?
Take all of the files in the child theme folder (functions.php, style.css and a screenshot) and compress the folder into a .zip file. Ensure that you already have the WordPress instance set up and running, and install the Divi.zip file (as downloaded via the Elegant Themes member area) via the Themes > Add New section of your WordPress dashboard. Once installed, click Activate. Now, Divi is running as the parent theme.
Next, return to the Themes > Add New section of your WordPress dashboard and select the .zip file of your child theme. After install, activate your child theme and you’re good to go!
PURCHASING PREMIUM CHILD THEMES
Not only do the premium Divi child themes help you save plenty of time, but all of the legwork is already done for you. From UX planning to aesthetic design, font selection and more, all of the bells and whistles are already crafted, and all that’s required is for you to add your relevant text and image content.
We recently published a list of The 30 Best Divi Child Themes so have a look through our collection of child themes (images included in an easy-to-preview lightbox gallery) and view the respective demo sites.
Aspen Grove Studios has a number of Divi child themes that are ready to go, so if you’re starting your next web dev project and are looking for a super quick and easy build, have a browse through our child themes, and be sure to check out our child theme bundle.
Thanks for reading!
Can we make changes to the child themes we purchased?
Can we white label the child themes, so that there are no “elegant” or “divi” traces in the source code?
thanks
Thanks for your writing!
Wordpress and Divi are very important when you do digital marketing jobs. You need to learn full of knowledge about them.
An interesting article!
Thank you so much
Hi Lisa,
Thanks for sharing the article, I think that it is very useful
very useful article,please write more,i will continue read it.
You have the power to keep the reader occupied with your quality content and style of writing.
I appreciate you and hoping for some more informative posts like this one…
Can you add plugins like Yoast to a premium child theme ?
Yes you can set it up to auto-install plugins from the repository… we do this with our premium themes.
This blog is the fascinating one and it induces me to know more about it. Thanks for the sharing this blog and keep on sharing these kinds of useful blogs.
Thanks for your feedback Mia!
There was a previous question about adding a child theme to an already made Divi site. Your advice was to “move all of your files into the child theme style sheet”. How do you do that? Also, how do you backup your files so the site isn’t lost? Thanks!
I’m confused……can I use the divi builder plugin to rearrange any Wordprss Site or only Divi Themes?
Hi Drew,
You can use the Divi Builder plugin on any WordPress theme. You won’t be able to rearrange content unless it’s built with the Divi builder if that makes sense. So for example you can add the plugin to a Genesis website but because a page or post was not built with the Divi Builder plugin you won’t be able to edit it with the builder unless you convert that content to the Divi builder. Even then it will only drop all the content into a text module. I hope this helps.
Hi there! Quick questin for you.
Is it possible (and is it wise) to buy a premium child theme, and then start making changes in the CSS?
Or is it advised to not do so, and start from scratch creating my own child theme?
Hi Ashkan,
You can make any changes you like to the style sheet to brand it to your brand. I recommend backing up the style sheet prior to making any changes in the event an error is made. That way you can add it back quickly if need be, good luck! Remember to come back and share with us your work!
Hi, this is a great article. I have the same question as Brant. And in your response, you indicated to ‘move all of your files into the child theme style sheet. It’s always best to make a backup of the site first in the event something happens.
How do you move all your files into the child theme stylesheet? And with respect to backing up the site. Currently I use the plugin BackWPup on my parent site. Going forward, would this plugin know to update the child theme vs the parent?
Great article. I had no idea I needed a child theme before researching how to add Google fonts. Seems like something that should be mentioned in the Divi documentation.
I already started tweaking my bare-bones Divi template settings, including some custom CSS. Does this mean it will be overwritten during an update?
Hi Brett,
Somehow my comment was deleted so I am not sure if you saw my comment and I don’t remember what I wrote so I am going to answer it again :). If you store you CSS in Divi Theme Options or the modules you should be fine but if you edit the core files of the theme like the footer.php file to add your own footer credits, it will get over-written unless you have a child theme. Any edits made outside of the modules or theme options will be over-written so it’s a best practice to use a child theme.
Very comprehensive and well-written. I finally understand child themes (and will no longer wonder why everything I set as sophisticated gray has reverted to turd brown of the original theme). Hence, I’m purchasing your child theme creator. And “purchased” your free subscription to this blog. Thanks.
Hi, great guide. I am new to wordpress. I have spent hours editing and building my new site with a Divi parent theme, but now I want to use a child theme, for many of the reasons you stated in this post. If I create and install a new child theme, will I lose all the previous work I have done to the site? Thank you
You shouldn’t as long as you move all of your files into the child theme style sheet. It’s always best to make a backup of the site first in the event something happens. We use All in One Migration, it’s free unless you have an abnormally large site then you will need an add-on. I hope this helps and good luck! Let us know how it goes.
Best,
David
Thank you very much for this info. From Argentina, Ignacio
Hey! So, I came across this guide through Googling. It contains some errors. Most importantly, the .php-code lacks “”, which if you are not familiar with coding, you would never know that is has to be at the beginning and end. Secondly, underneath where you explain about functions.php you write “Once you have amended all of the above details to fit your deliverables, save the file as style.css within the child theme folder.” I’m sure you meant “save as functions.php”
Thanks for the catch Stu, we have amended the blog post, we really appreciate it.
I have divi 2.0 (and some later version) and I want to upgrade to the new killer 3.0 drag and drop! I have a child theme that I use but I am not sure how to upgrade to 3.0 and get the new functionality while keeping my child theme. Any idea the steps I should take?
Hi Ryan, if you have a child theme then none of your customizations should be overwritten when updating Divi. Before you do any updates you should always perform a full backup and ideally work on a staging version of the site first.